Your engine uses a serpentine belt to power the accessories like the power steering and water pumps. Over time, the belt gets worn out and can slip or even break. Visually inspect your serpentine belt for cracks, fraying, and other damage. In any case, it is a good idea to replace your serpentine belt according to the manufacturer’s recommended service interval.
For an overview of the general procedure, check out the video above from YouTube channel, Help Me DIY. While the video covers the procedures for a Porsche 986 Boxster, the steps are very similar for the Porsche 981 Boxster and Cayman. You can find detailed parts, tools, and instructions for the 981 below.
Tools Required:
Parts Required:
Torque Specs & Fluid Capacities:
Engine carrier bolt: 44 ft-lbs
Step-by-Step Instructions:
Step 1: Prepare your car and work area
- Ensure engine is cold, so you don’t burn yourself.
- Put on eye protection and gloves.
- Gather parts and tools.
Step 2: Gain access to the engine
- Slide and tilt both seats as far forward as possible to give yourself room to work.
- Carefully pry out rear speaker covers, which are held in place with plastic and metal tabs as shown in the video from Jeff Richardson.
- Free the carpet from the two hooks at the sides of the speakers and gently pull out the entire carpet trim out.
- Use a ratchet and 10mm socket to remove the fasteners that hold the metal engine lid in place.
- Remove the engine lid from the car.
Step 3: Remove the engine mount spacer.
- Locate the engine mount spacer as shown in this video from tony Santos.
- Use a 16mm wrench to loosen the engine mount spacer bolt.
- Unscrew the carrier bolt until there is enough room to place a zip tie around it. This will give you something to hold onto and a way to prevent to bolt from dropping.
- Remove the engine mount spacer bolt.
- Wedge a rag underneath the actual spacer to prevent the spacer from falling into the engine bay.
- Use a mallet to lightly tap the engine mount spacer until you can remove the spacer by hand. Be very careful not to drop the spacer!
Step 4: Remove the old serpentine belt
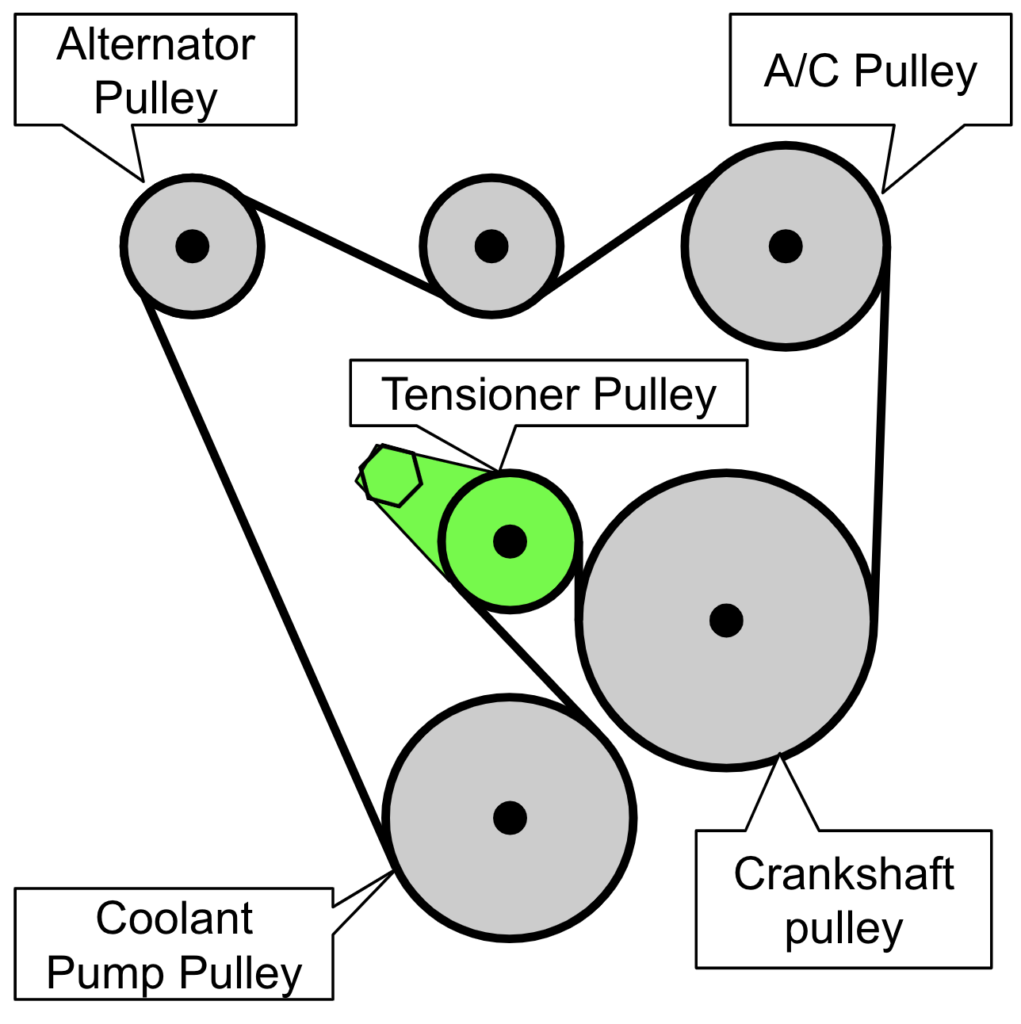
- Before you replace the serpentine belt, take a picture of the belt routing pattern.
- Locate the serpentine belt tensioner and use a 30mm wrench to rotate it clockwise as far as it can go. This will remove tension from the belt.
- While holding the tensioner in this position, use your other hand to remove the belt off the alternator pulley.
- Slowly allow the tensioner to return to its original position, then guide the old belt off the remaining pulleys.
- Remove the belt through the gap where the engine mount spacer was.
Step 5: Install the new serpentine belt
- Guide in the new belt and install it in reverse order, starting from the coolant pump pulley and routing it as shown in the diagram from the previous step.
- Put the belt over the tensioner pulley last.
- Use the 30mm wrench and rotate the tensioner clockwise.
- Slide the belt over the tensioner pulley, then slowly allow the tensioner to return to its original position.
Step 6: Reinstall everything in reverse
- Refit the engine mount spacer. You may need to tap it lightly to get it back into place.
- Apply medium strength thread locker on engine spacer bolt and insert it back in.
- While engine spacer bolt torque spec is 44 ft-lbs, you will not be able to get a torque wrench and socket on so just hand tighten it to feel.
- Reinstall the engine lid and just snuggly hand tighten the fasteners.
- Insert the carpet panel and speaker trims.
- Clean up your work area and put away your tools.


