Brake fluid is a critical component to your vehicle’s braking system. When you press the brake pedal, the brake fluid transfers the pressure to your brake calipers and presses the brake pads against the rotors. Over time, the brake fluid can absorb air and moisture, which will allow the brake fluid to compress under pressure. This results in spongy and even ineffective braking.
Overall, this is an easy procedure that someone with some experience working on cars can do. To perform this DIY, check out the helpful tutorial above from the YouTube channel, D Wray’s Garage. Detailed steps can be found below.
Tools Required:
- Motive Power Brake Bleeder, For European Vehicles
- Motive Brake Fluid Catch Bottle Kit
- K Tool International Low Profile Jack (3.33 Ton)
- Slotted Polyurethane Jack Pad (1 required)
- ESCO 10498 Performance Jack Stands (Pair)
- Wheel Chocks
- 1/2-Inch Drive 19MM Non-Marring Lug Nut Socket
- 1/2″ Drive Extension Breaker Bar
- 1/2 Inch Drive Click Torque Wrench (25-250 ft.-lb.)
- Wheel Bolt Guide For Porsche, Audi, and VW (2 recommended)
- 11mm Combination Wrench
- Plastic Funnel, 16 oz.
- Mechanic’s Tool Set
- Safety Glasses
- Disposable Gloves
Parts Required:
Torque Specs & Fluid Capacities:
Wheel bolts: 118 ft-lbs
Brake bleeder valves: 6 ft-lbs (just hand tighten until snug)
Brake fluid capacity: ~1 liters
Step-by-Step Instructions:
Step 1: Prepare your vehicle and work area
- Park your car on a flat surface.
- Gather tools and parts.
- Put on eye protection and gloves.
Step 2: Setup the power brake pressure bleeder
- Fill it with 1.8 liter of brake fluid; save the remainder to top off your reservoir at the end.
- Then pressurize it to 15 psi.
- Note: Brake fluid is extremely corrosive, so do not let brake fluid touch anything on your car that is painted.
Step 3: Gain access to the brake fluid reservoir
- Open the engine hood.
- Locate the brake fluid reservoir, which is located under the plastic cowl right under the windshield.
- Remove the plastic cowl.
Step 4: Connect the power brake bleeder to your brake fluid reservoir
- Unscrew brake fluid reservoir cap and remove mesh filter.
- Screw on the power brake bleeder adapter onto the brake fluid reservoir.
- Connect the power brake bleeder to the adapter using the supplied hose and fitting.
Step 5: Prepare to bleed each brake caliper in the following order
- Start with the rear passenger side and drain: 0.5 liter
- Move to the rear driver side and drain: 0.5 liter
- Move to the front passenger side and drain: 0.3 liter (split 50/50 for outer & inner nipples)
- Finish off with the front driver side and drain: 0.3 liter (split 50/50 for outer & inner nipples)
- Note: While the brake fluid capacity is ~ 1 liter, we recommend bleeding more fluid just to make sure you remove all the old fluid.
Step 6: Remove the wheel of the corner you will be working on
- You will need to remove your wheels to access the brake calipers.
- We recommend you work on one corner at a time.
- Important: If your vehicle has air suspension, you will need to disable the self-leveling feature before raising your vehicle in the air. With the key in the “ON” position, press and hold the low level suspension button for 10 seconds. You should see an indicator appear in the gauge cluster indicating self-leveling is deactivated.
- Before you lift your car, be sure to chock off the wheels on the opposite side to prevent your car from rolling.
- Use a 19mm lug nut socket and breaker bar to break the wheel bolts loose, but do not remove them.
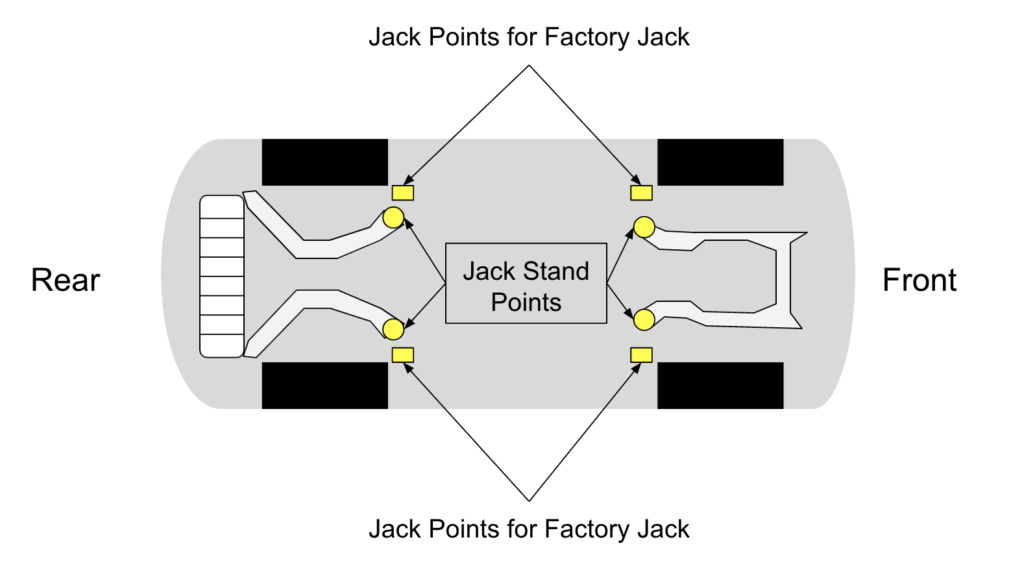
- As shown in the picture, use a jack and jack pad to lift each corner at the approved jack locations; then lower your vehicle onto a jack stand using the approved locations. NEVER rely on a jack to support your vehicle!
- Remove the wheel; to help with removal and reinstallation, we recommend you use two wheel guide bolts.
Step 7: Bleed the brake caliper
- Drain the brake caliper bleeder valves by connecting the catch can and loosening the bleeder valves with an 11mm wrench; note that the rear brake calipers only have a single bleeder valve while the front brake calipers have two bleeder valves.
- Monitor how much brake fluid you are collecting, so you don’t drain too much.
- Once you’ve drained enough fluid from each bleeder valve, tighten it to stop the flow of brake fluid; DO NOT OVER-TIGHTEN the bleeder valves or you can easily brake them. Just make sure they’re snug.
Step 8: Re-install your wheel and lower the vehicle
- Re-install your wheel using wheel guide bolts to help you realign it.
- Torque the wheel bolts in a star pattern to 118 ft-lbs.
- Remove the jack stands.
- Remove the wheel chocks.
Step 9: Repeat the steps 6-8 for the remaining corners
Step 10: Top off your brake fluid reservoir
- Depressurize the power brake bleeder and disconnect it from the brake fluid reservoir.
- Remove power brake bleeder adapter from the brake fluid reservoir.
- If necessary, use a funnel and top off the brake fluid reservoir with the remaining fresh brake fluid to get the level just under the “max” line.
- Re-install the brake fluid reservoir filter, cap, and plastic cover.
Step 11: Clean up your work area
- Empty your old brake fluid into the now empty brake fluid container.
- DO NOT dispose of your old brake fluid by pouring it out or putting it in the trash; brake fluid is extremely corrosive and bad for the environment, so be sure to take the old fluid to your local auto parts store for recycling.
- Put all of your tools and supplies back where they belong.
- You’re all done!


