Your engine uses a serpentine belt to power the accessories like the power steering and water pumps. Over time, the belt gets worn out and can slip or even break. Visually inspect your serpentine belt for cracks, fraying, and other damage. In any case, it is a good idea to replace your serpentine belt according to the manufacturer’s recommended service interval.
While this is a fairly straight forward DIY, you will need to have some experience working on cars or mechanical aptitude and patience to replace the serpentine belt yourself. If you are unsure, please visit a certified Porsche dealership or independent mechanic. Check out the detailed instructions and pictures below (big thanks to Class5Kayaker from Rennlist for allowing us to use his photos).
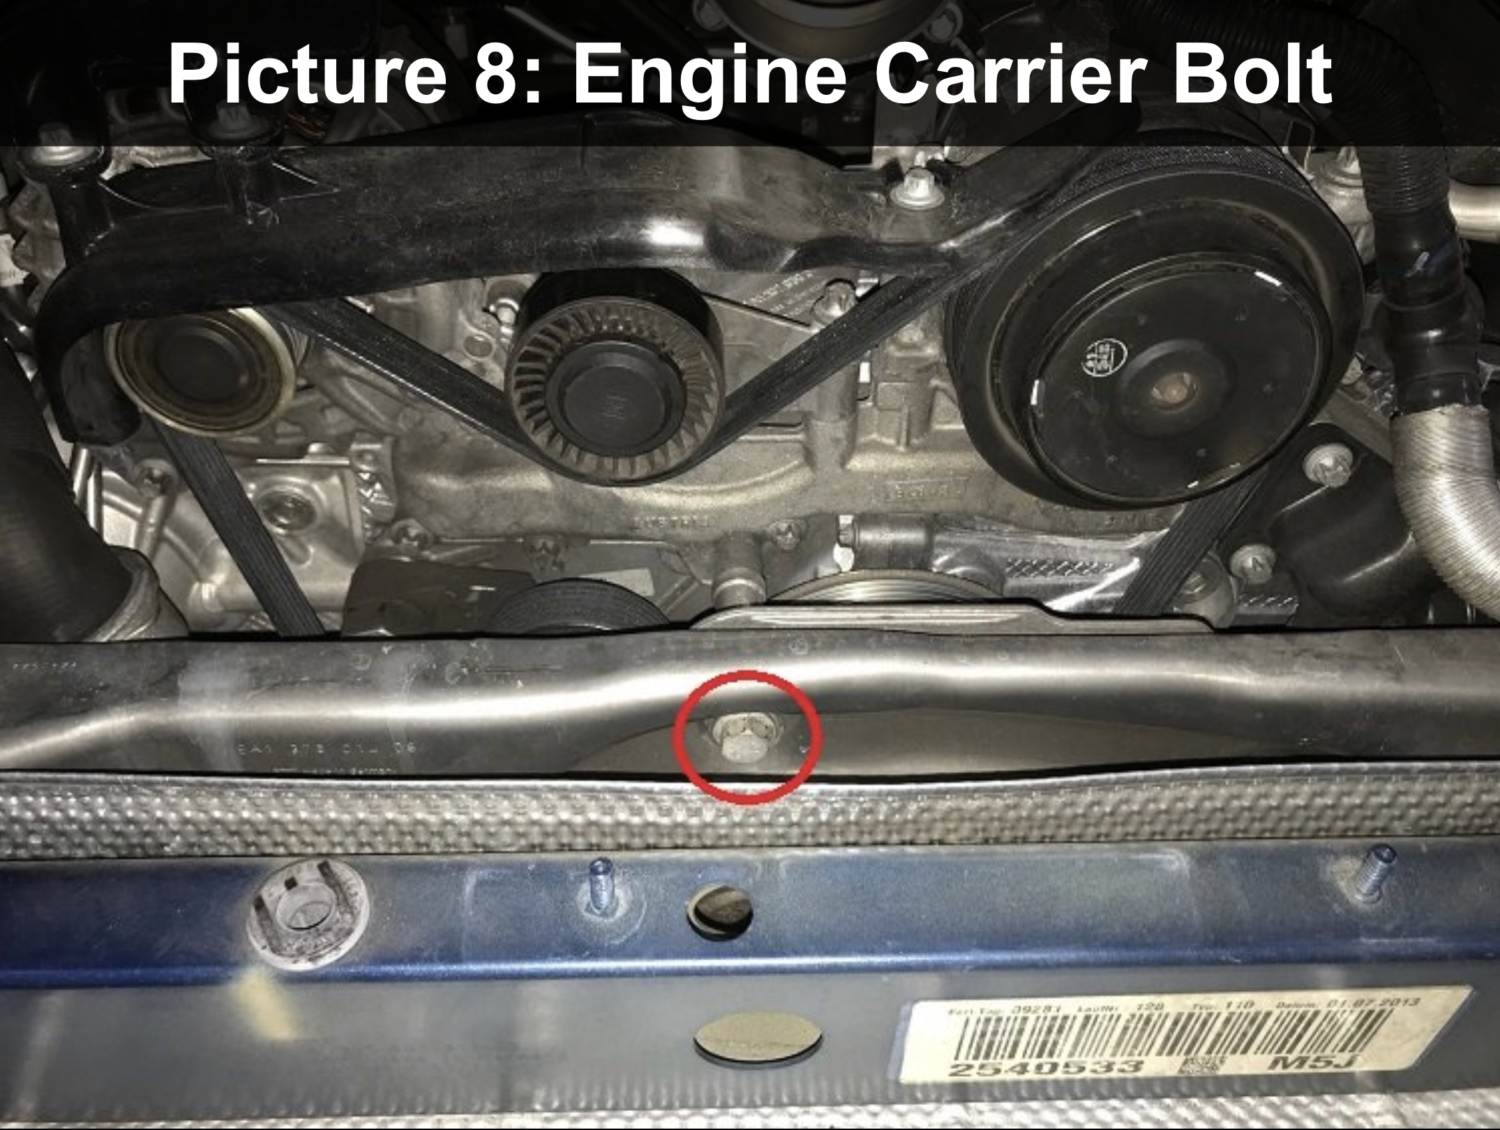
Engine carrier bolt: 44 ft-lbs
Step 1: Prepare your vehicle and work area.
- Since you will be on the engine, perform this job with a cold engine to eliminate the risk of burns.
- To protect your vehicle from scratches, use masking tape to cover the edges of the bumper and fenders that meet up with the bumper and tail lights.
- Also, lay a blanket underneath the bumper, so you can set it down without scratching it.
- Gather the required parts and tools.
Step 2: Step 2: Remove the rear tail lights.
- Start by raising the rear spoiler as shown in this video from ml414skidoo.
- To do this, turn on the ignition, then press the spoiler button on the center console until it illuminates.
- Then, press and hold the spoiler button until the indicator goes away; this will put your spoiler up in service mode.
- With the spoiler raised, locate and remove the plastic trim pieces on the left and right sides by gently prying them up.
- On each side, you will now see 2 T25 Torx screws, which you will need to remove.
- Carefully wiggle each tail light out and unclip the wiring connector by pressing on the tab and pulling the connector out.
Step 3: Remove the rear bumper.
- Because of the large size and awkward shape of the bumper, we strongly suggest a second pair of hands when it comes time to remove and re-install the bumper.
- On each side of the bumper, use a T30 Torx bit to remove the 3 screws within the wheel arch and 2 screws on the bottom of the bumper.
- Remove another 4 T30 Torx screws on the bottom of the bumper in between the exhaust tips.
- Remove another 4 T30 Torx screws at the top of the bumper, which are accessible with the spoiler up.
- Now, there is only one T30 Torx screw left on each side behind the tail light.
- Remove the T30 Torx screw on one side, then have your assistance support that side of the bumper.
- Remove the final T30 Torx screw on the opposite side while supporting the bumper.
- Carefully, have you and your assistance remove the bumper and set it down on a blanket so you don’t scratch the paint.
- With the bumper set on the ground, unclip the wiring connect on the driver’s side.
Step 4: Remove the rear spoiler.
- Open engine lid; the rear spoiler should already be open from the previous step.
- Unscrew various T45 and T30 Torx fasteners that secure the bottom left and right sides of spoiler to the vehicle body (see red circled areas in Picture 1).
- Remove 10mm bolt that holds the black plastic piece under the oil and coolant caps (see green circle in Picture 2)
- Remove the coolant cap, but leave the oil cap on. The oil filler tube is moveable, so you can move the black plastic piece around the oil filler tube.
- Disconnect the wiring harness for rear spoiler (see yellow circle in Picture 2).
- Lift the rear spoiler up and away; do not try to disconnect the engine lid latch because it all comes out with the spoiler.
- Place your spoiler on a soft blanket to avoid scratching it up.
- Immediately screw the coolant cap back on to avoid letting in any debris.


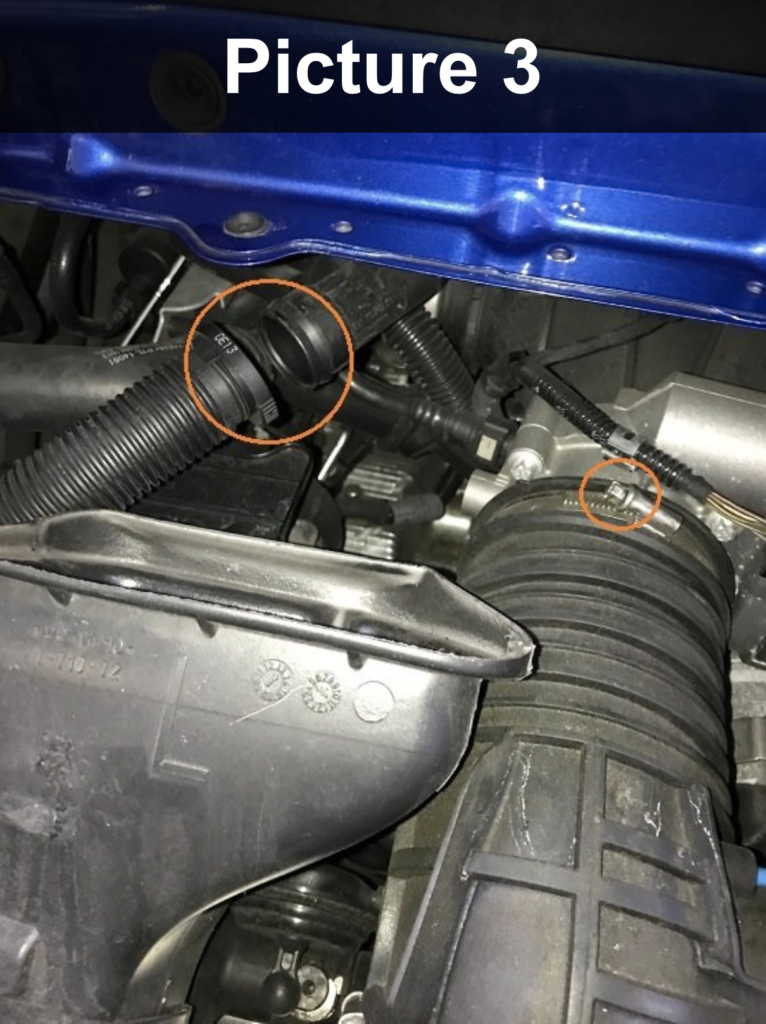
Step 5: Remove the engine air box.
- Remove the engine air box by unscrewing two bolts, which are on the bottom left and right sides of the air box (not visible in Picture 2, but in the general area of the red circles).
- Note: If you want to change your engine air filters, now is a good time. Simply remove several T25 Torx screws to gain access to the air filters.
- As seen in the orange circles in Picture 3, disconnect the sound symposer connection by squeezing it.
- Use a 7mm socket or flat head screwdriver to loosen the hose clamp on the engine air intake tube; then use some force to pull the tube free.
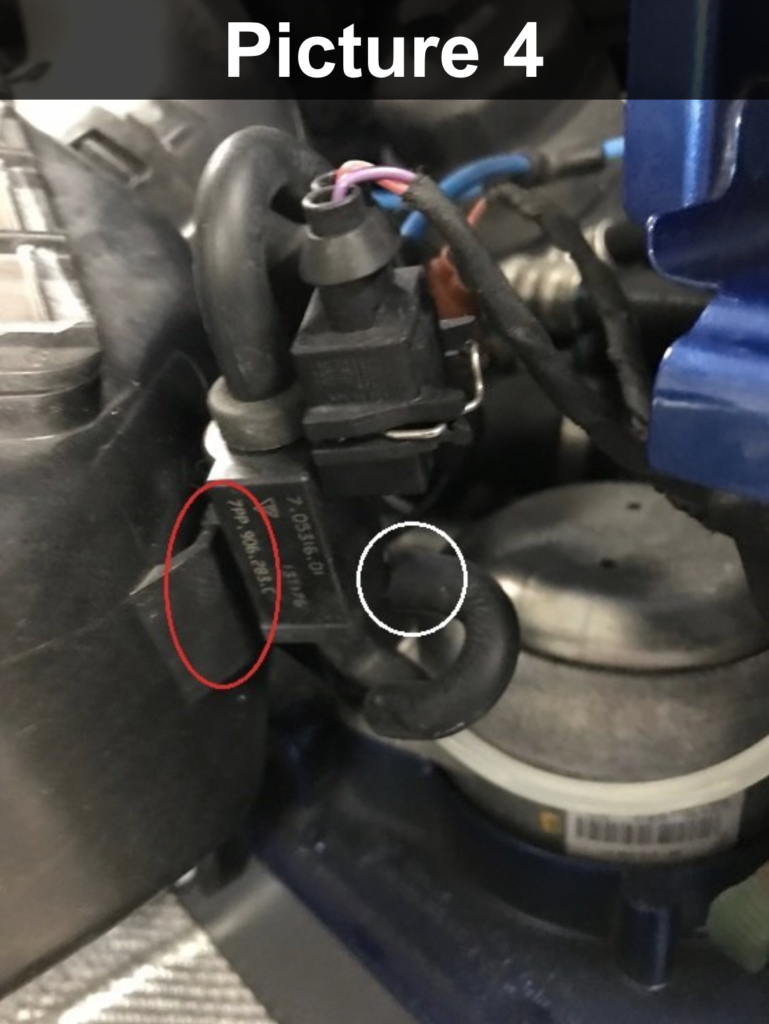
- As seen in Picture 4, unclip the sensor on the far right side of the air box (red circle in Picture 4) and disconnect the vacuum line (white circle in Picture 4).
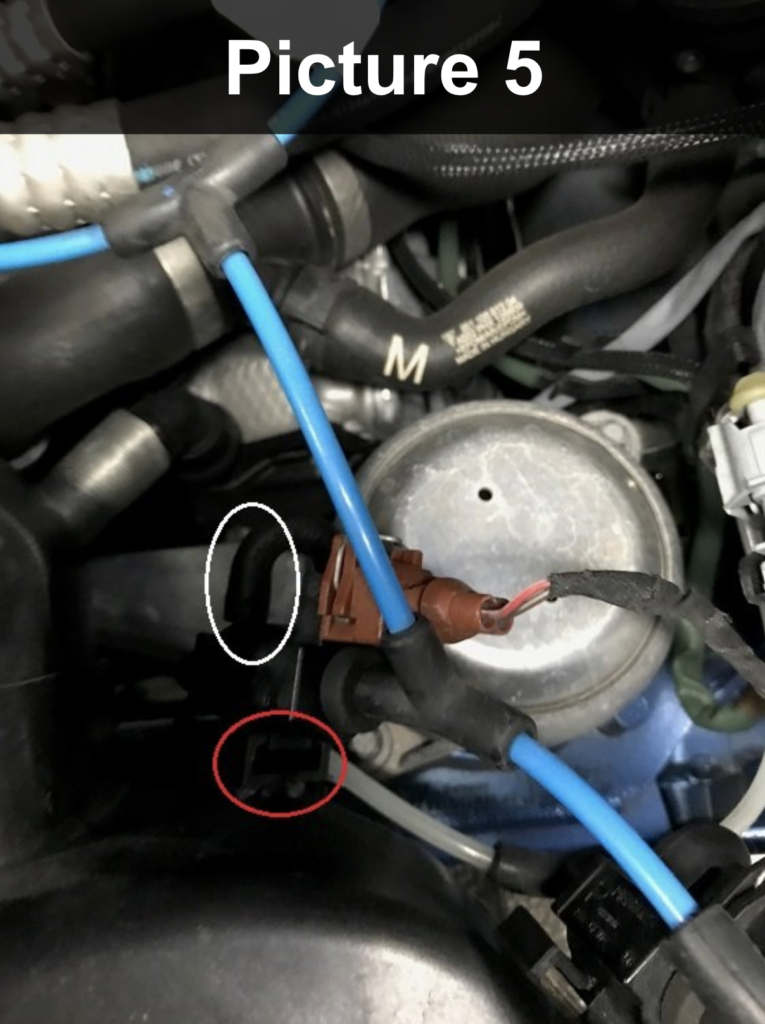
- As seen in Picture 5, unclip the sensor towards the center of the air box (red circle in Picture 5); then disconnect the vacuum line (white circle in Picture 5).
- Disconnect the final vacuum hose that is connected to the engine intake tube (white circle in Picture 6)
- Remove the engine air box from the engine bay.

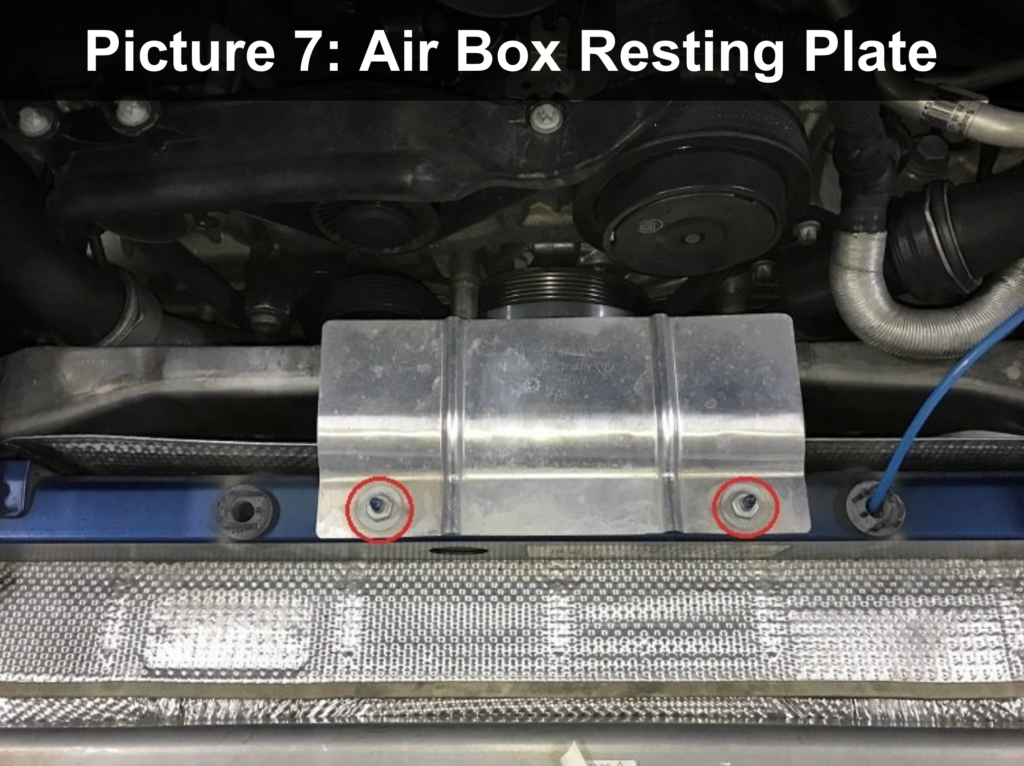
Step 6: Remove the air box resting plate.
- There is a resting plate for the air box that you can now see.
- Remove the two 14mm nuts circled in red in Picture 7.
- Remove the resting plate.
- Note: When reinstalling the 14mm nuts, just hand-tighten them snuggly. Do not over torque them or you could break the studs.
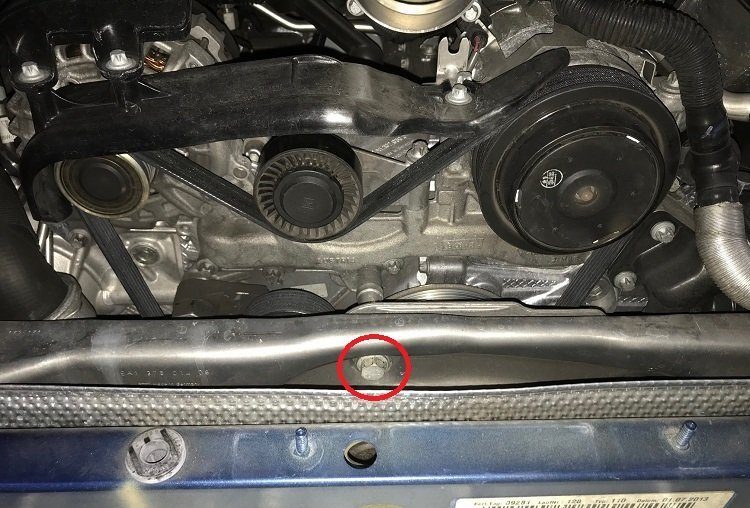
Step 7: Remove the engine carrier bolt and spacer sleeve.
- Now you have access to the serpentine belt.
- Remove the engine carrier bolt (red circle in Picture 8) with a 16mm socket and ratchet.
- Remove the spacer sleeve (blue circle in Picture 9), which you may need to tap it gently a few times with a rubber mallet.

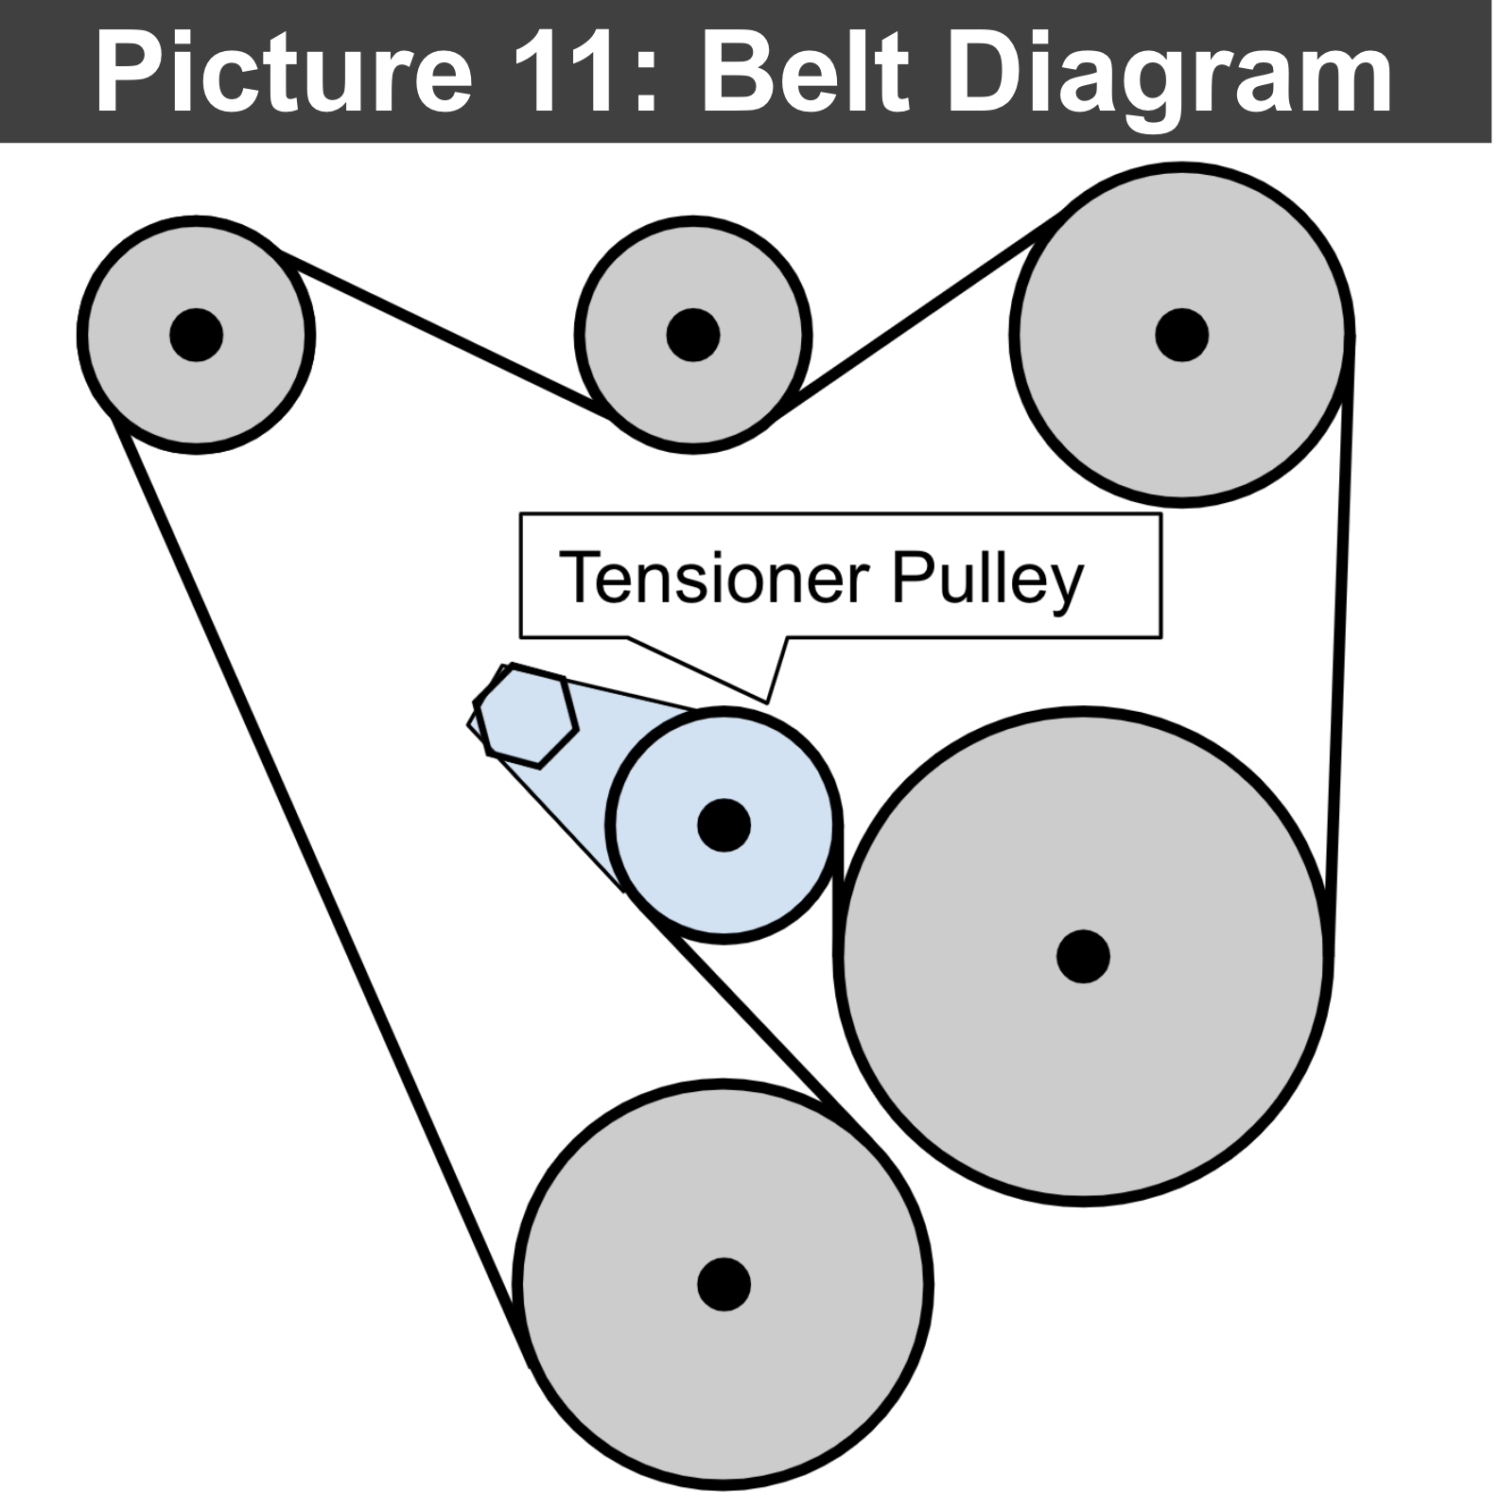
Step 8: Remove and replace the serpentine belt.
- Now you can replace the serpentine belt, but first take a picture of the belt routing so re-install the new belt properly.
- Use a 30mm box wrench and rotate the tensioner pulley (see Picture 10) clockwise all the way until it stops.
- Install the new belt following the routing arrangement in Picture 11.
- Be sure to loop the serpentine belt over the tensioner pulley last.
- Have one person loop the serpentine belt over the tensioner pulley while the other person turns the tensioner pulley all the way clockwise.
- This will create just enough slack to allow you to get the serpentine belt on.
- Once the serpentine belt is properly in place, slowly allow the tensioner pulley to rotate back in place.

Step 9: Re-install everything in reverse.
- Insert the engine carrier spacer sleeve, then torque the carrier bolt to 44 ft-lbs.
- Note: If you have trouble screwing in the engine carrier bolt, you may need to place a flat piece of wood under the metal oil pan and jack up the engine slightly to re-align the engine.
- Re-install the air box resting plate, air box, rear bumper, rear spoiler, and tail lights. Just hand tighten the rest of the fasteners.
- Clean up your work area and put up your tools.
- You’re all done!


Mark Jordan says:
Your instructions in Step 4 are not accurate in regard to my 2014 Carrera S. Once the bumper was removed I only needed to remove 4 T45 Torx fasteners to remove the spoiler assembly.
Add a warning in step 6 to avoid over tightening the fasteners so as not to break off a stud.
eCarGuides says:
Done. Thanks for the feedback.
Shane says:
Very detailed, thanks so much!
Shane Miller says:
Add 30mm box wrench to the tool list. Not common in tool sets…
ecarguidesllc says:
Great suggestion! It’s added now!
Robert Nagaishi says:
Your guide has proven excellent up to the point where I remove the spoiler. What’s the trick to disconnect the electrical connector for the spoiler? Also, don’t I need to disconnect the engine lid latch cable and, if so, what is the procedure?
Thanks