Changing your automatic transmission fluid (ATF) and transmission filter is important to keep your drivetrain smooth. While performing this service isn’t technically hard, filling the transmission fluid to the precise level is difficult without some experience. Therefore, we do not advise you attempt to do-it-yourself unless you are comfortable working on cars.
Even if you don’t feel comfortable performing this service yourself, you can still save a bunch of money by purchasing the parts required online and paying an independent mechanic for just the labor. For an overview of the procedure, check out the procedure from the YouTube channel, Road and Race. While the video covers a 986, the process is nearly identical on the 987. You can find detailed instructions below.
- Mechanic’s Tool Set
- Torx Bit Socket Set, T10-T60
- Metric Hex Bit Socket Set, 3mm to 10mm
- Etekcity Lasergrip 774 Digital Infrared Thermometer (to measure ATF level)
- 1/2″ Drive Extension Breaker Bar
- 1/2 Inch Drive Click Torque Wrench (25-250 ft.-lb.)
- 1/4 Inch Drive Click Torque Wrench (20-200 in.-lb.)
- Socket Adapter & Reducer Set
- K Tool International Low Profile Jack (3.33 Ton)
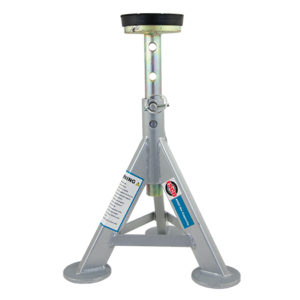
- ESCO 10499 Low Profile Flat Top Jack Stands (Pair) (4 required)
- Wheel Chocks
- Oil Drain Pan, 6 Quarts Capacity
- Fluid Transfer Pump Kit
- Disposable Gloves
- Safety Glasses
ATF Capacity: 3.5 liters (measured when ATF is between 86-104°F)
17m hex Fill plug: 59 ft-lbs
8mm hex drain plug: 30 ft-lbs
Transmission oil pan bolts: 6 ft-lbs
Transmission filter bolts: 4.5 ft-lbs
Aluminum crossmember bolts: 48 ft-lbs
Step 1: Prepare your vehicle and work area
- Start with a cold engine.
- Park your car on a flat surface.
- Gather required tools and parts.
- Put on gloves and eye protection.
Step 2: Raise your vehicle off the ground
- To give yourself enough clearance to work, safely raise your vehicle using a lift or jack and jack stands.
- ENSURE YOUR CAR IS LEVEL! This is essential to ensure the correct fluid level.
- NEVER rely on a jack to keep your car up; use jack stands to safely support your vehicle.
- Also be sure to use wheel chocks to prevent your car from rolling.
- To lift your vehicle on jack stands, check out this helpful video from CarFanatic.
- While it is for the Porsche 997, the procedure is nearly the same except for jacking the rear.
- To get the rear on jack stands, jack the rear where the sway bar mounts to the chassis. Be sure to use a jack pad to prevent damage.
- Once your car is on jack stands, give your car a hard shove to make sure it is secure.
Step 3: Gain access to the transmission oil pan
- As shown in the video from Tobe Tinkering, unscrew the 15mm fasteners holding the diagonal braces in place, then remove the diagonal braces.
- Unscrew the 15mm fasteners holding the support plate, then remove the support plate.
- Note: With the diagonal braces and support plate, the wheels cannot support the vehicle. If you need to put the wheels on the ground, reinstall these parts first. Also, any time you loosen or remove the diagonal braces, you will need to get an alignment afterwards.
Step 4: Remove the transmission oil pan fill plug
- Locate the fill plug on the bottom of the transmission pan and break it loose with a 17mm hex bit and ratchet. Do not fully remove the fill plug.
- Place a drain pan under the fill plug in case ATF comes out, then remove the fill plug.
- Note: If you cannot get the fill bolt off, STOP and do not proceed with the procedure as you will not be able to fill your transmission with new ATF.
Step 5: Drain the automatic transmission fluid
- Locate the 8mm drain plug located on the bottom of the transmission oil pan.
- Break the drain plug loose, but don’t fully remove it.
- Place a drain pan underneath the drain plug, then remove the drain plug; be sure to catch the drain plug so it doesn’t fall into the drain pan.
- Clean off the drain plug threads and reinstall it along with a new sealing ring (see parts section).
- Torque the drain plug to 30 ft-lbs.
Step 6: Remove the transmission oil pan
- Place drain pan below the transmission oil pan.
- While supporting the transmission oil pan (to avoid damaging anything), remove the T30 Torx bolts that hold the transmission oil pan in place.
- Carefully pull off the transmission oil pan and watch out for any ATF that comes out.
- Inspect the mating surface where the transmission oil pan and transmission meet; if there is any residue or leftover gasket material, clean it off.
- With the transmission oil pan off, take a look at the fill plug baffle so you will be able to route your fluid pump hose through it accordingly.
- Clean the transmission oil pan thoroughly with a degreaser, then dry it off.
Step 7: Install the new transmission filter
- The transmission filter is held on by T30 Torx bolts.
- Remove these bolts, then pull out the old transmission filter.
- Pour any fluid inside the transmission filter into your drain pan.
- Apply a thin layer of new ATF onto the rubber seal on the transmission filter to help it seat properly.
- Install the new transmission filter and torque the bolts to 4.5 ft-lbs.
Step 8: Reinstall the transmission oil pan
- Place your new gasket on the transmission oil pan.
- Install the new gasket and transmission oil pan back onto the transmission.
- Screw in the T30 Torx bolts by hand, but don’t tighten them.
- Torque the T30 Torx bolts to 4.5 ft-lbs or just slightly by hand; be sure to use a criss-cross pattern as shown in the photo to ensure the gasket is properly seated.
- DO NOT over torque the bolts or you can create a leak in the gasket.
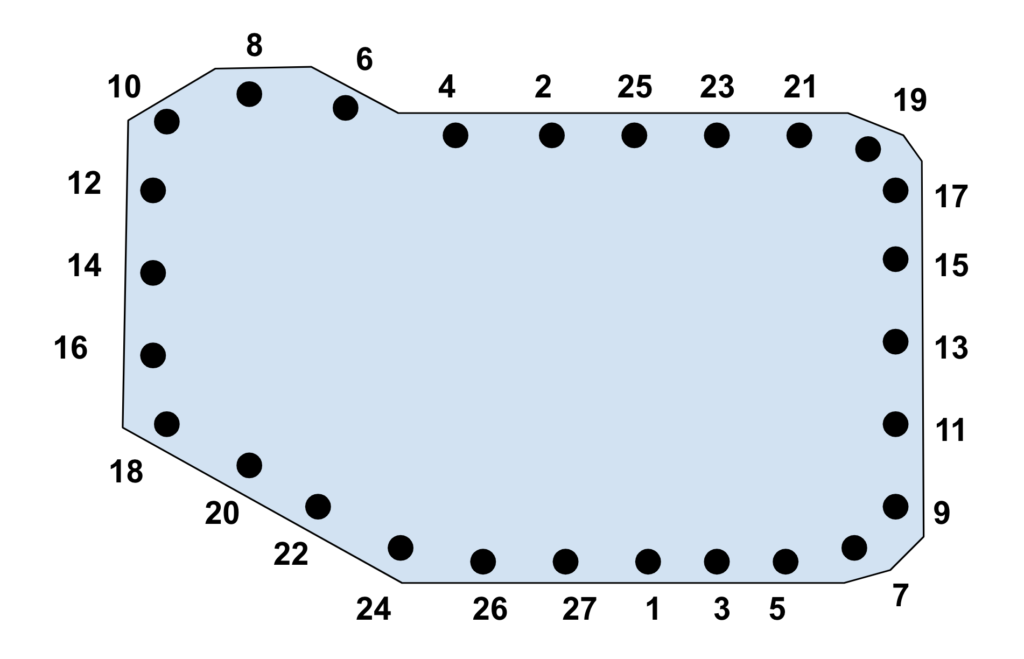
Step 9: Fill the transmission with an initial amount of fresh ATF
- As shown in the video from BleeinJeep, attach the fluid pump to your container of ATF and route the other hose into the transmission oil pan fill hole; be sure to route the hose through the internal baffle or you will not be able to get the new ATF into the pan.
- Pump new ATF fluid into the transmission until fluid begins to drip out of the fill port.
Step 10: Add additional ATF and ensure you reach the correct level
- To ensure the ATF is at the correct level, your vehicle must be level and the ATF level must be measured once the fluid reaches between 86-104°F (30-40°C).
- With the brakes engaged, start your car and cycle the transmission from PARK to DRIVE and then REVERSE. Pause in each gear for 10 seconds.
- Go back under the car and add more ATF if fluid isn’t dripping out.
- Once fluid is dripping out, use a pyrometer to measure the temperature of the oil pan.
- When the transmission oil pan reaches the target temperature and ATF is barely dribbling out, you’ve reached the right level.
- Before the transmission oil pan reaches 104°F (40°C), reinstall the fill plug along with a new o-ring and torque it to 59 ft-lbs.
- Note: If the ATF pan exceeds the target temperature, install the drain plug, turn off the engine, and allow the ATF to cool back down.
Step 11: Reinstall everything and lower your vehicle
- Ensure there are no fluid leaks.
- Reinstall the diagonal braces and support plate and use the following torque specs:
- Torque support plate fasteners to 48 ft-lbs.
- Torque fasteners that connect the diagonal braces to the support plate and rear axle cross member to 48 ft-lbs.
- Torque fasteners that connect diagonal braces to vehicle body to 22 ft-lbs, then tighten them an additional 1/4 turn.
- Lower your vehicle back on the ground.
- Clean up your work area and put away your tools.
- Save your old ATF in a contain, so you can drop it at your local auto parts store to recycle.

