When it comes to saving money maintaining your car, changing your own brake pads is one of the best ways. Another thing to consider is whether you should change out just your brake pads or both the brake pads and rotors. Most manufacturers recommend changing the brake pads and rotors at the same time. While we generally agree, if your brake rotors are evenly worn and have sufficient thickness remaining, you can just replace the brake pads.
To perform this DIY, check out this helpful tutorial above from Daniel Hansens. While the video covers the Diesel model, the procedure is virtually the same on all 958 Cayennes. Detailed steps can be found below.
Note: This write-up is only for vehicles equipped with 360mm front and 330mm rear diameter rotors. This article does not apply to vehicles equipped with Porsche Carbon Composite Brakes (PCCB). Please measure your rotors before hand to ensure the parts and procedures below apply to your vehicle.
- Mechanic’s Tool Set
- K Tool International Low Profile Jack (3.33 Ton)
- ESCO 10498 Performance Jack Stands (Pair)
- Wheel Chocks
- 1/2″ Drive Extension Breaker Bar
- 1/2 Inch Drive Click Torque Wrench (25-250 ft.-lb.)
- 1/2-Inch Drive 19MM Non-Marring Lug Nut Socket
- Wheel Bolt Guide For Porsche, Audi, and VW (2 recommended)
- 1/2 Inch Drive Extension Set
- 10-Piece Triple Square Socket Set, Metric 4mm – 18mm
- Torx Bit Socket Set, T10-T60
- Metric Hex Bit Socket Set, 3mm to 10mm
- Brake Pad Spreader Tool
- Medium Strength Thread Locker
- Loctite Silver-Grade Anti-Seize
- Permatex Ultra Disc Brake Caliper Lube
- PB Blaster Penetrating Oil
- Safety Glasses
- Disposable Gloves
- Respiratory Mask
- Genuine Porsche Front Brake Pad Set - P/N: 95835193910
- Pagid OEM Rear Brake Pad Set - P/N: 355015101, 95835293981
- FRONT LEFT – Porsche Genuine Brake Rotor - P/N: 95835140350
- FRONT RIGHT – Porsche Genuine Brake Rotor - P/N: 95835140450
- REAR – Brembo OE Equivalent Rotor - P/N: 09987111 (2 required)
- Holstein Brake Wear Sensor - P/N: 2BWS0223, 95861236500 (front, 2 required)
- Holstein Brake Wear Sensor - P/N: 2BWS0224, 95861236550 (rear, 2 required)
- Brake Pad Hardware Kit - P/N: 97035195901 (2 required for front)
- Brake Pad Hardware Kit - P/N: 7PP615269, 355206181 (1 kit required for rear)
Front brake caliper bolts: 104 ft-lbs
T50 brake rotor set screw: 10.5 ft-lbs
Rear brake caliper bolts: 63 ft-lbs
Wheel bolts: 118 ft-lbs
Step 1: Prepare your vehicle and work area
- Ensure your car is parked on a flat surface and the brakes are cool.
- Put on eye protection, gloves, and a respirator because brake dust is very hazardous.
- Gather tools and parts.
Step 2: Extract a small amount of brake fluid from the brake fluid reservoir.
- Open the hood and gain access to the brake fluid reservoir by removing the plastic panel on the driver’s side near the windshield cowl.
- Unscrew the brake fluid reservoir cap, remove the mesh filter inside, and extract a little bit of brake fluid using a new turkey baster.
- Check out the video for an overview. While it covers a Porsche 911, after gaining access to the brake fluid reservoir, the process is the same.
- Save this brake fluid in a clean container, so you can re-use it later. If your brake fluid looks dark or contaminated, it is a good idea to also perform a brake fluid flush.
- Reinstall the brake fluid reservoir cap when you are done to prevent debris from getting in.
Step 3: Raise your vehicle off the ground.
- IMPORTANT: If you have air suspension and decided to jack up the car, you will need to lock the air suspension by starting the car and holding the air suspension button up for 10 seconds. You will see an indicator pop up on your gauge cluster.
- Unless you are using a vehicle lift, we recommend you raise your car one corner at a time.
- Start by chocking off your wheels to prevent the car from rolling.
- On the corner you will be working on, break the wheel bolts loose but do not loosen them beyond that.
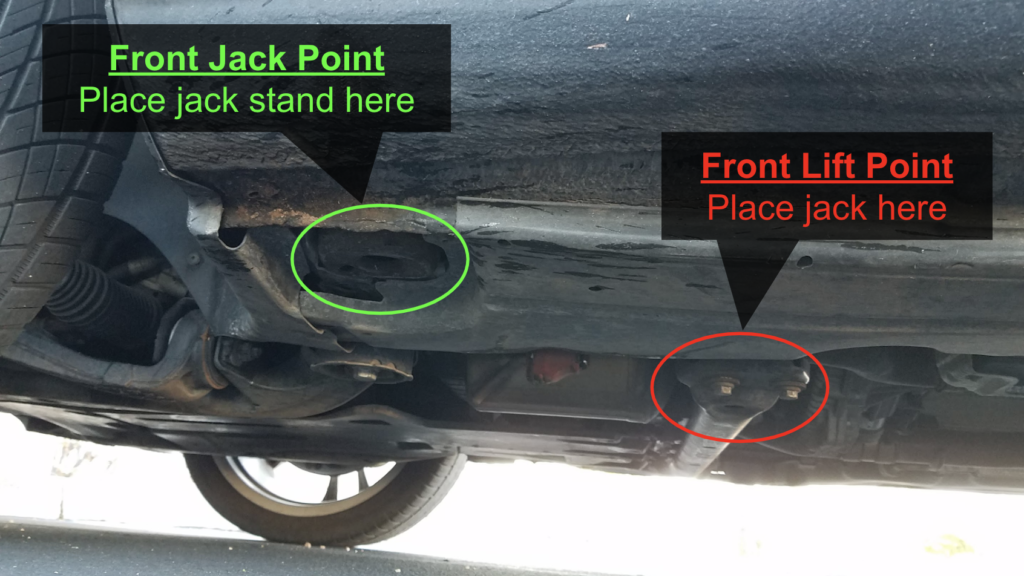
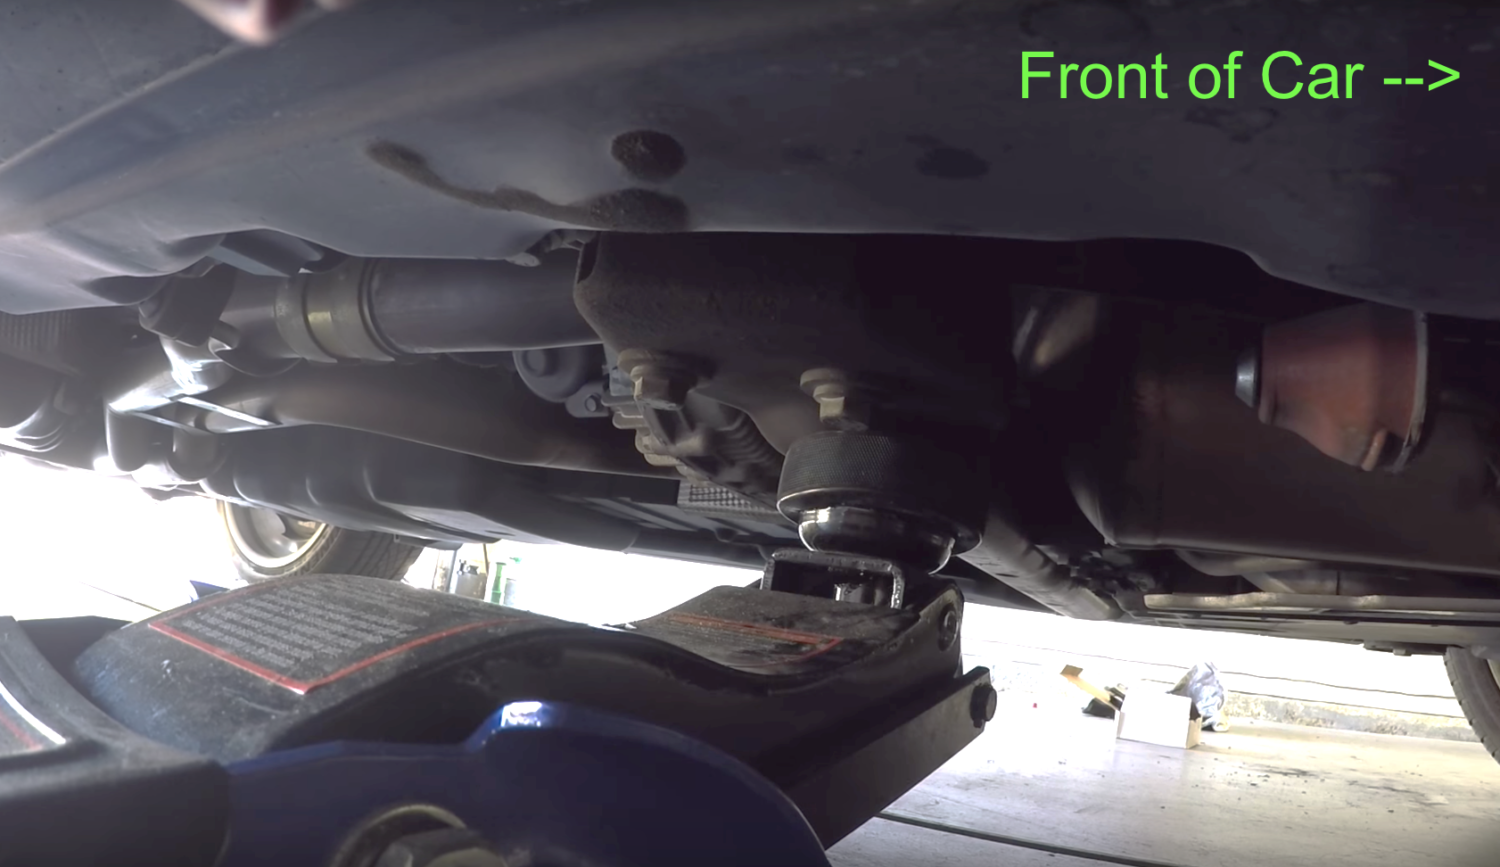
- To get a jack stand on a front jack point, jack the vehicle by the center cross member as shown in the photos.
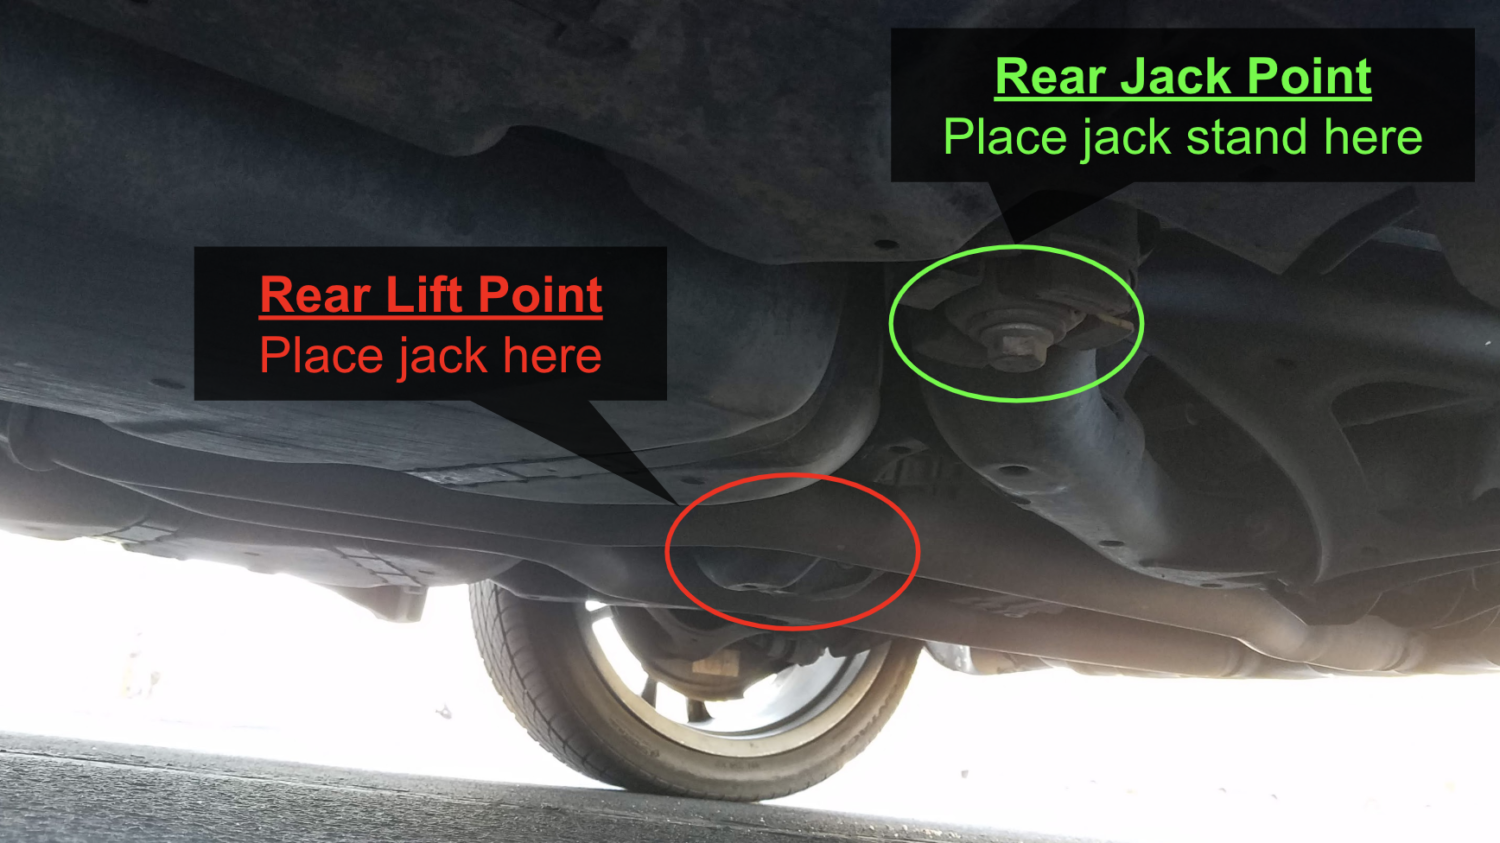
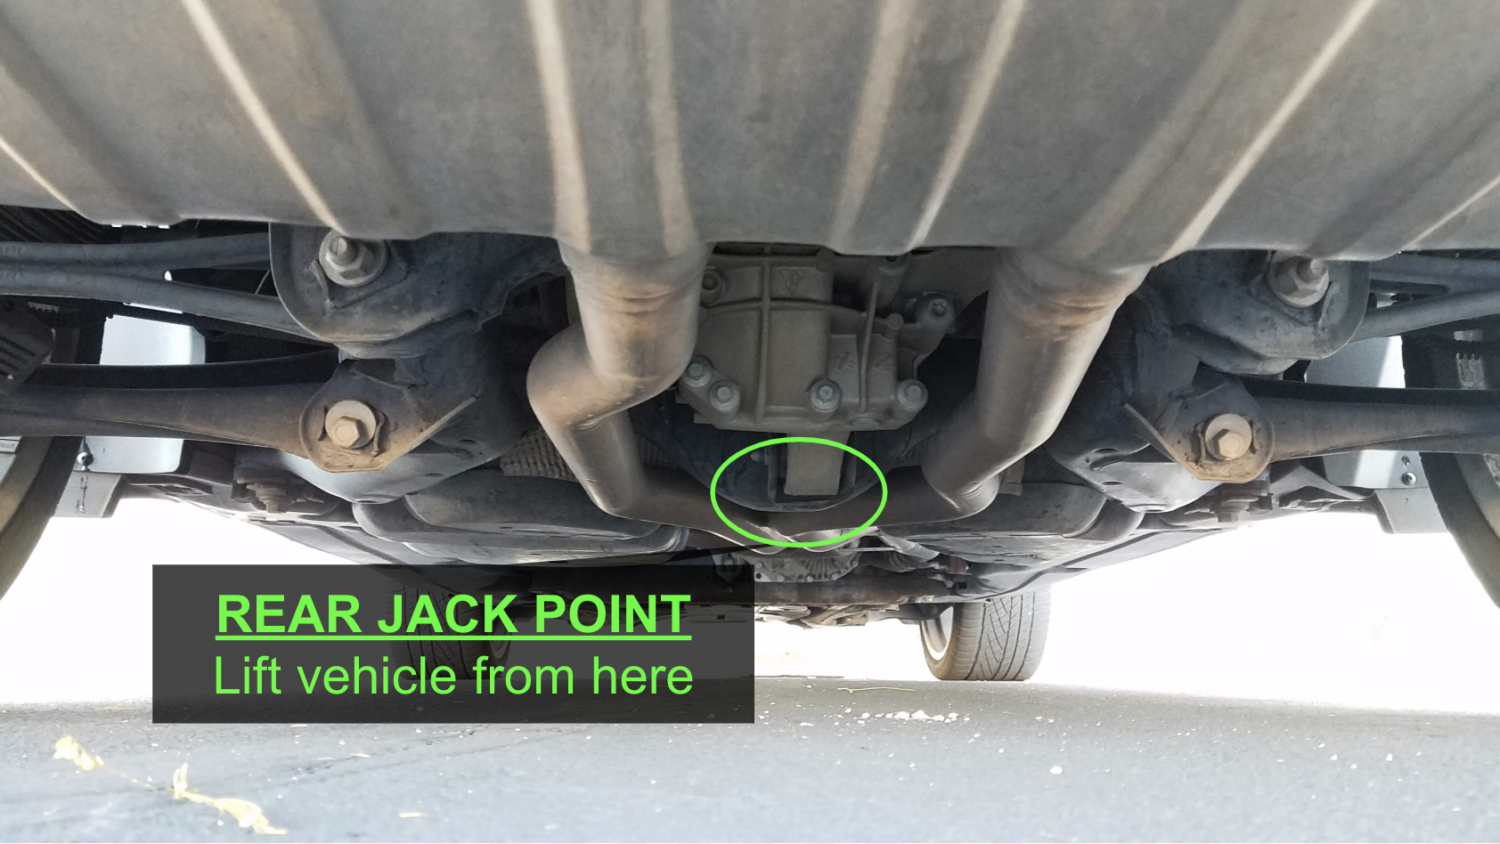
- To get a jack stand on a rear jack point, jack the vehicle up be the rear cross member which is just ahead of the rear differential and in between the exhaust pipes.
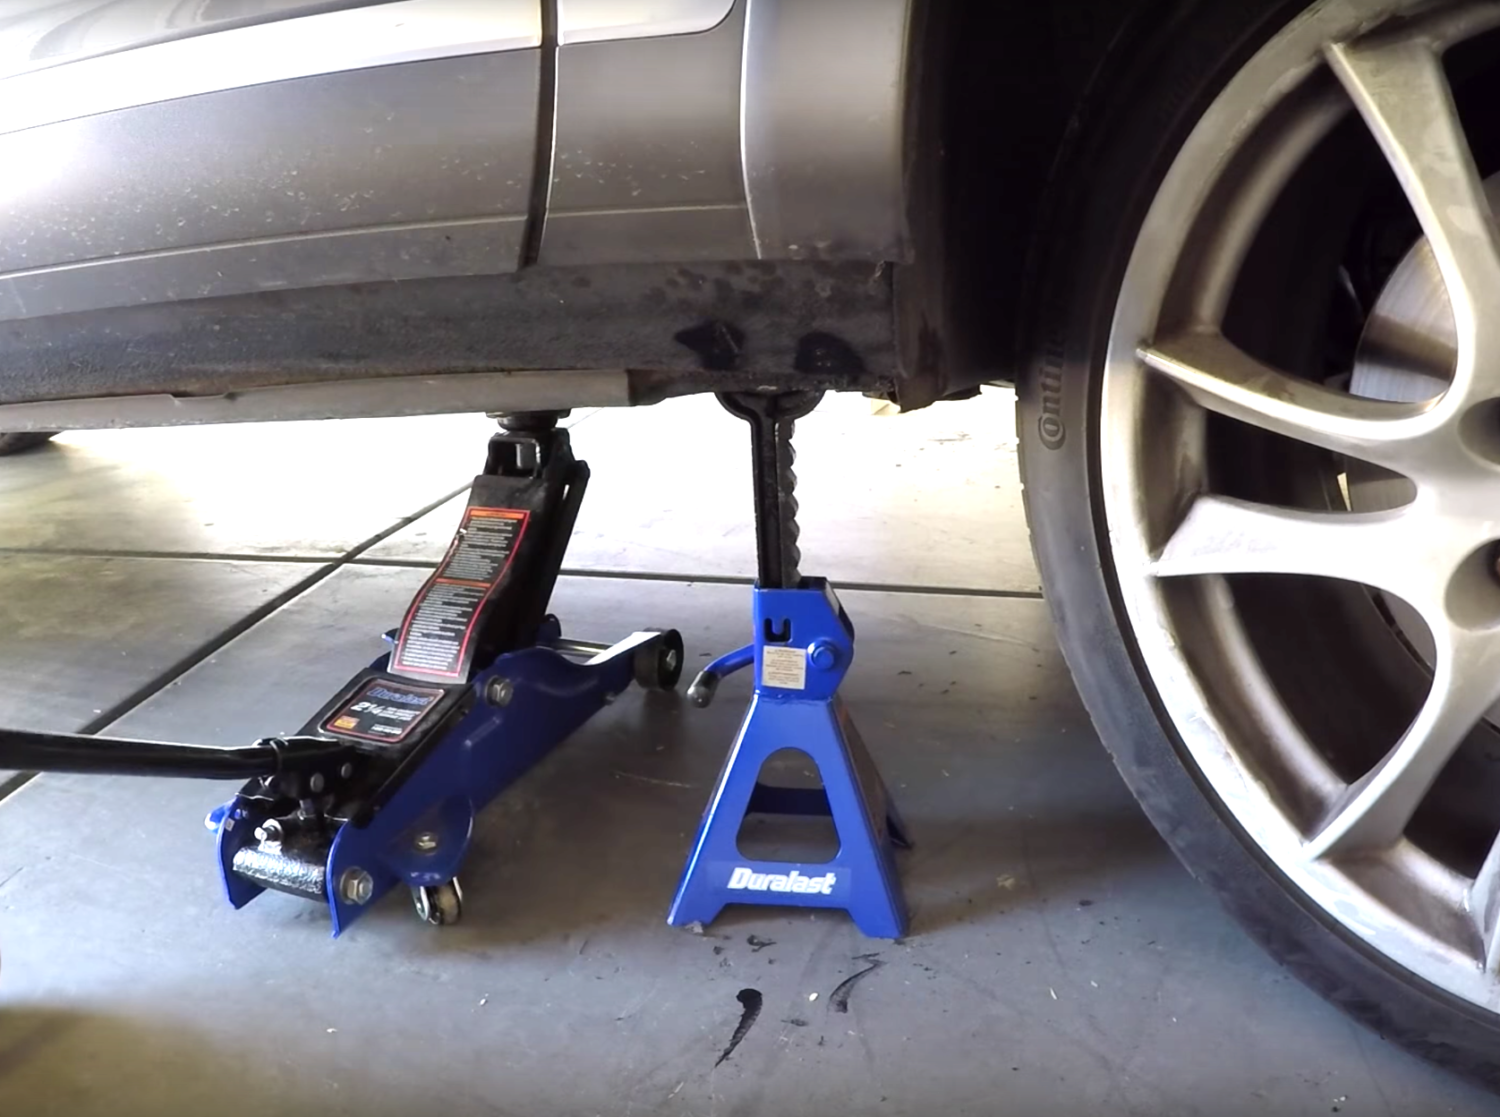
- Once raising the vehicle high enough, place a jack stand under the approved jack point and lower the jack until the vehicle rests securely on the jack stand.
- Give the vehicle a hard shove afterwards to ensure it is secure.
- NEVER rely on a jack to support your vehicle.
Step 4: Starting with one of the front corners, gain access to the brakes by removing the wheel
- Remove the wheel using a 19mm socket and breaker bar.
- Place two wheel guide bolts to help you remove the wheel.
- For the front corners, after the wheel has been removed, turn the steering wheel all the way in the direction of the corner you will be working on.
- This will give you enough space to remove the brake caliper bolts.
Step 5: Remove the brake caliper
- To replace your brake rotor, you will need to remove the brake caliper.
- Start by disconnecting the brake pad sensor wiring connector by pressing the plastic tab and pulling down on it.
- Remove the brake bleeder valve cap, so you can move the brake pad sensor wiring out of the way.
- Free up the brake line from the upright by removing one hex bolt.
- Take string or bungee cord and tie the brake caliper onto the suspension. This will prevent the brake caliper from hanging by the brake line when you remove the caliper.
- Remove the brake caliper by using a 14mm triples square socket and breaker bar to remove the two caliper bolts.
- If the brake rotor has a lip on the edge and the brake pad is catching, use a flat head screw driver to pry between the brake rotor and pads.
- Move the brake caliper to the side, so you can remove the brake rotor.
Step 6: Install the new brake pads
- Before removing the brake pads, use a brake pad spreader or small pry bar to spread out the brake pads. This will allow the new, thicker brake pads to fit over the rotor.
- Gently pry the brake pad sensors off the pads using a flat head screwdriver, then pull the brake pads out of the caliper. If your brake pad sensors didn’t get triggered and are in good condition, you can reuse them.
- Remove the old brake pad hardware clips and replace them to prevent brake noise.
- Take the new brake pads and apply brake lubricant around the edges and backside to prevent squealing. DO NOT get any on the surface of the brake pads!
- Insert the brake pads with sensor attached into the caliper.
- Note: If you are only replacing the brake pads, skip to step 8.
Step 7: Install the new brake rotor
- Note: When working on the rear brakes, make sure your parking brake is not engaged or you won’t be able to get the rotor off.
- Remove the brake rotor set screw using a T50 torx bit and ratchet.
- You should now be able remove the rotor.
- If you have difficulty getting it off, apply some penetrating oil to where the rotor meets the hub and use a hammer to lightly tap around the wheel hub area; let the penetrating oil get to work for a few minutes, then use a rubber mallet to loosen the rotor.
- Clean off the wheel hub with brake cleaner and give it a nice scrub with a wire brush or steel wool.
- Apply anti-seize to where the rotor meets the wheel hub to seizing in the future.
- Clean off the new brake rotor with brake cleaner to remove any oil residue from the manufacturing process.
- Place the new brake rotor on the hub.
- Apply anti-seize to the set screw and torque it to 10.5 ft-lbs or just hand tighten.
Step 8: Reinstall the brake caliper
- Place the brake caliper over the rotor, apply medium strength thread locker to the caliper bolts, and torque them to 104 ft-lbs (note, the video incorrectly references 180 ft-lbs). Note: Porsche states that caliper bolts are single use and new ones should be used each time. If you are going to reuse your caliper bolts, inspect and clean off the threads if necessary to prevent binding or damaging the aluminum upright.
- Place the wheel back on and tighten the wheel bolts snug in a criss-cross pattern.
- Lower the vehicle off the jack stand.
- Once the wheel is on the ground, torque the wheel bolts to 118 ft-lbs in a criss-cross pattern.
Step 9: Repeat the prior steps on the remaining corners
- As shown in this other video from Daniel Hansens, the procedure for the rear brake pads and rotors are very similar to that of the fronts.
- When installing the caliper bolts, torque them to 63 ft-lbs (note: video incorrectly references 180 ft-lbs).
Step 10: Clean up your work area and put everything up
- Pro Tip: Don’t throw your brake rotors away. Most recyclers will pay you for your rotors, so get in touch with ones around you.
- Also, brake pads are hazardous to dispose of in the trash. Contact your waste management company and see what steps they recommend.
- Congrats on saving a bunch of money doing-it-yourself!


