Changing your rear differential oil is important to keep your drivetrain smooth. Over time, the oil loses its critical properties that prevent metal on metal contact. This is a easy do-it-yourself as long as you have the proper tools and ability to get your vehicle off the ground safely. If you are unsure of how to do this procedure, please visit a certified mechanic.
To get an overview on how to replace the rear differential drive oil, check out this video from DIY Dan. While this video is not vehicle specific, it should give you a good idea on what is involved. Check out the rest of the article for detailed steps, tools, and parts required. Big thanks to ciaka who has allowed us to use his images for this article.
- Mechanic’s Tool Set
- 3/8 Inch Drive Click Torque Wrench (10-80 ft.-lb.)
- Torx Bit Socket and E-Torx Star Socket Set | 35-Piece
- Stubby Allen Key Set
- Oil Drain Pan, 6 Quarts Capacity
- Fluid Transfer Pump For Quart Bottles
- K Tool International Low Profile Jack (3.33 Ton)
- Slotted Polyurethane Jack Pad
- ESCO 10499 Low Profile Flat Top Jack Stands (Pair) (4 required)
- Wheel Chocks
- Disposable Gloves
Oil drain plug: 26 ft-lbs
Oil inspection plug: 26 ft-lbs
Heat shield bolts: 7.5 ft-lbs
Air compressor bracket bolts: 7.5 ft-lbs
Rear final drive (open differential) oil capacity: 1 liters
Rear final drive (with differential lock) oil capacity: 1.15 liters
Step 1: Prepare your vehicle and work area
- Starting with a cold engine, take your car for a quick 5 minute drive; this will warm up your drivetrain fluid and make the draining process easier.
- Put on eye protection and gloves.
- Park your car on a level surface.
- Gather parts and tools.
Step 2: Raise your vehicle off the ground
- To give yourself enough clearance to work, safely raise your vehicle using a lift or jack and jack stands.
- NEVER rely on a jack to keep your car up; use jack stands to safely support your vehicle.
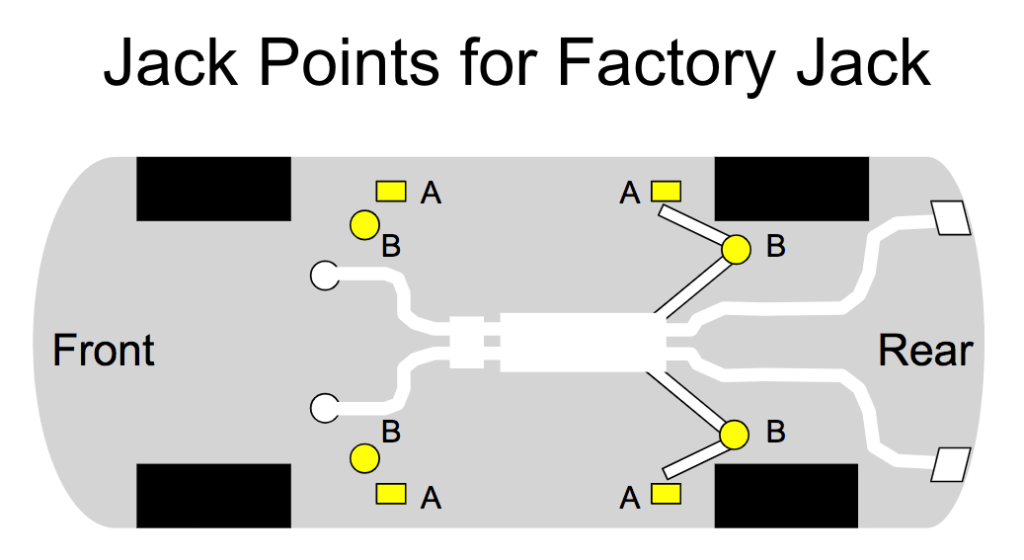
- To raise your vehicle on jack stands, as shown in the picture, lift each corner with a JACK using LIFTING POINT A; then and place the JACK STAND on LIFTING POINT B.
- While raising your vehicle on jack stands, be sure to use wheel chocks to prevent your car from rolling.
- Once your car is on jack stands, give your car a hard shove to make sure it is secure.
- ENSURE YOUR CAR IS LEVEL! This is essential to ensure the correct fluid level.
- Note: If your car has air suspension, disable the leveling system by starting the vehicle and holding the “high level” control for 10 seconds; an indicator will appear in the gauge cluster letting you know the leveling system has been disabled. Failure to disable auto-leveling can result in suspension damage.
Step 3: Remove the heat shield
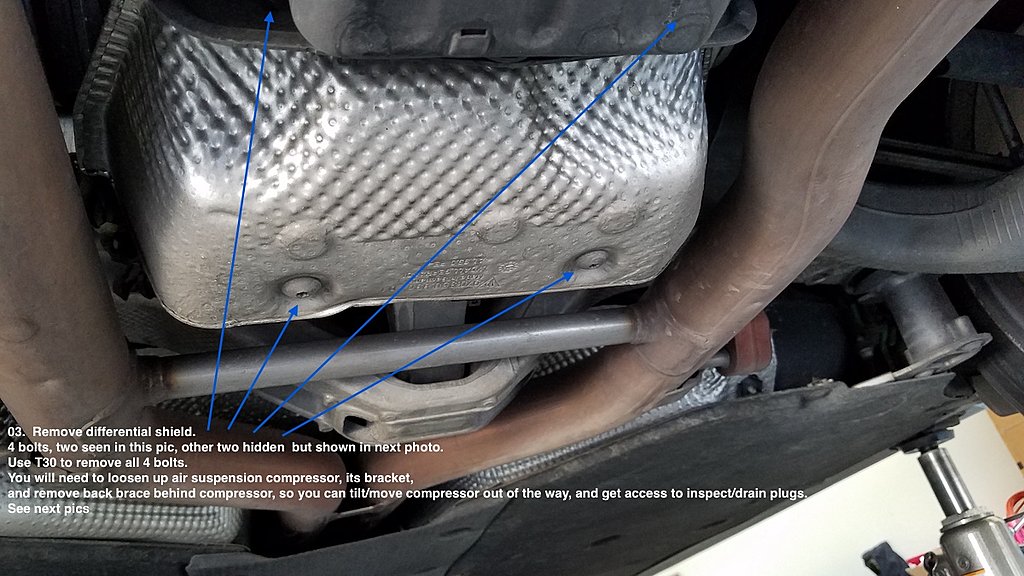
- To gain access to the rear differential drain and fill bolts, you will need to remove the rear differential heat shield.
- If your vehicle is equipped with air suspension, you will need to remove the air suspension compressor; if you don’t simply remove the 4 T30 bolts holding the heat shield in place.
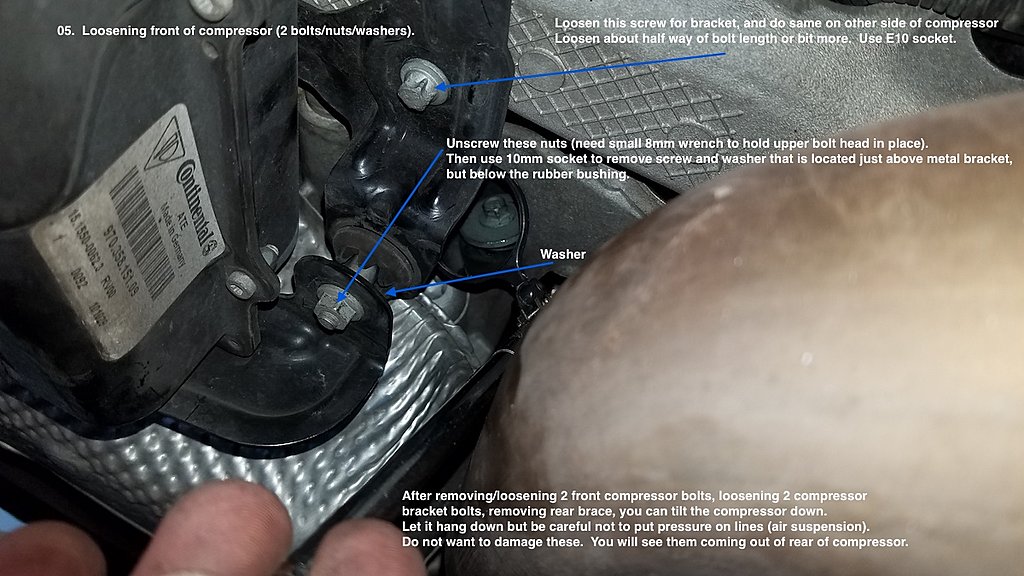
- To remove the air suspension compressor, locate the two upper bolts that hold the air suspension compressor bracket in place and use an E10 socket and ratchet to loosen them halfway.
- Then, use an 8mm wrench and a 10mm socket to remove the two bolts that connect the lower bracket to the upper bracket.
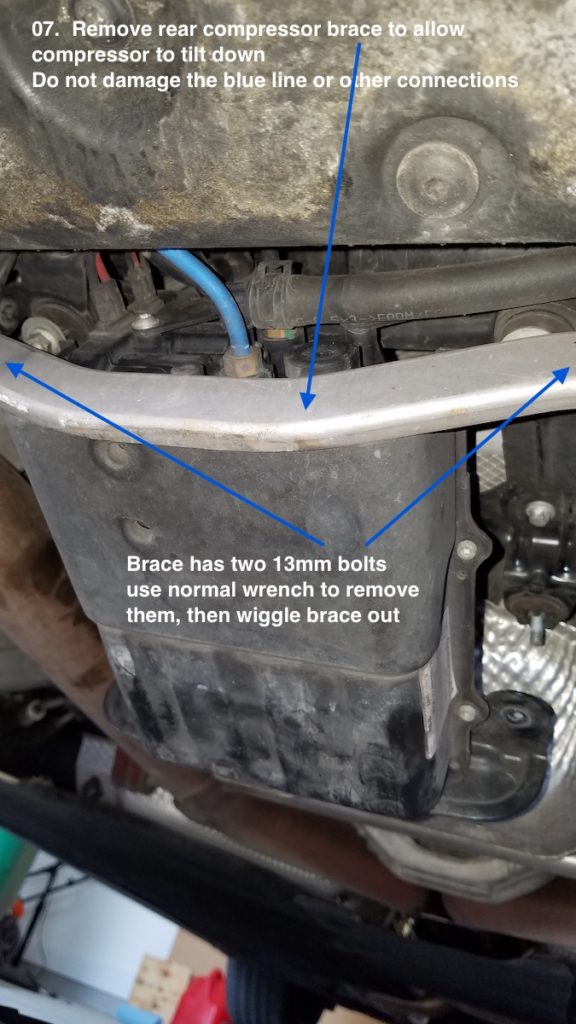
- Now remove the metal brace behind the air suspension compressor; remove the two 13mm bolts.
- Carefully allow the compressor to tilt downwards and hang.

Step 4: Remove the fill plug
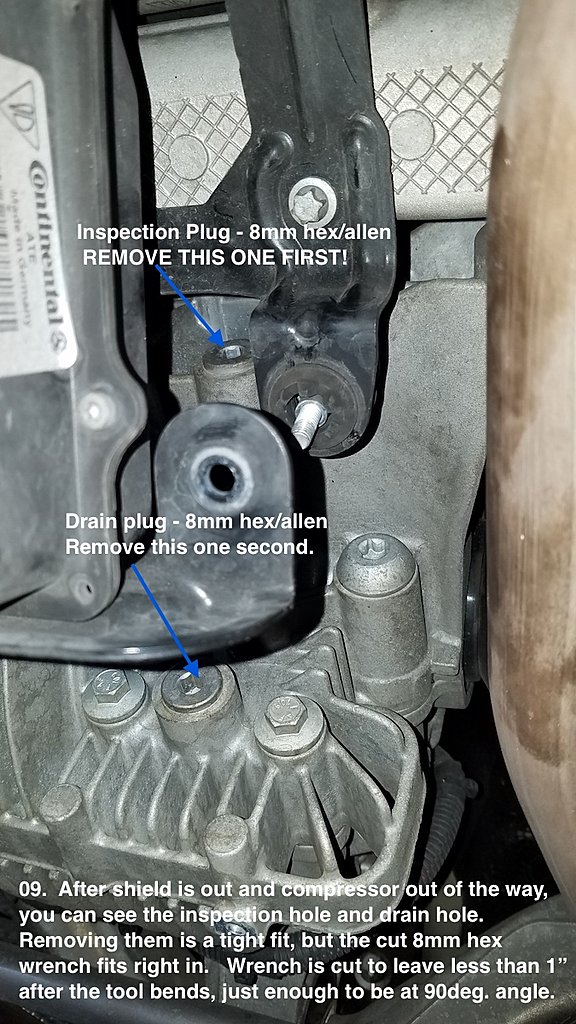
- Locate both inspection and drain plugs at the back side of the rear differential as shown in the picture.
- Starting with the fill plug (aka “inspection plug”), use a ratchet, appropriate extension, and an 8mm hex socket to break loose and remove the fill plug.
- If you cannot get the fill bolt off, STOP and do not drain the fluid or you will be unable refill the transmission oil.
- If you can remove it, proceed to the next step.
Step 5: Drain the old fluid
- Break loose the drain plug using a ratchet and an 8mm hex socket, but don’t remove it yet. If you don’t have enough room, try using a stubby allen key (see tools section).
- Position the oil catch pan underneath the oil drain plug, then remove it; make sure to catch the drain plug before it falls into the oil catch pan.
- Let the oil drain for at least 15 minutes.
- Reinstall the drain plug along with a NEW o-ring and torque it to 26 ft-lbs using a torque wrench.
Step 6: Fill in the fresh oil
- Using a fluid pump, add new oil to the differential via the fill port.
- Assuming your car is level, you’ve reached the right oil capacity once oil begins spilling out of the fill port.
- Remove the pump hose and wipe off any spillage.
- Reinstall the inspection plug along with a NEW o-ring and tighten it to 26 ft-lbs with a torque wrench.
Step 7: Reinstall everything in reverse
- Refit the heat shield and air suspension compressor brackets; tighten all bolts to 7.5 ft-lbs with a torque wrench or just snuggly by hand.
- Lower the vehicle to the ground.
- Clean up your work area.
- Recycle the used oil at your local auto parts store.


Nas says:
How do i know if mine has the differential lock or open differential? 2010 panamera 4s
ecarguidesllc says:
That’s a good question. The fill procedure is the same for either differential. You can just have 2 liters of gear oil on hand and just keep filling the differential until the oil spills out of the fill port. Hope this helps.
Dave says:
Could you just confirm that torque on the drain and fill plugs please? I’m just asking as it seems quite high compared to the front diff oil change guide at https://ecarguides.com/maintenance-guides/how-to-change-all-wheel-front-differential-drive-oil-on-a-porsche-panamera-2010-2016/
Many thanks in advance.