Your engine uses a serpentine belt to power the accessories like the power steering and water pumps. Over time, the belt gets worn out and can slip or even break. Visually inspect your serpentine belt for cracks, fraying, and other damage. In any case, it is a good idea to replace your serpentine belt according to the manufacturer’s recommended service interval.
For an overview of the general procedure, check out the video above from YouTube channel, Help Me DIY. You can find detailed parts, tools, and instructions below.
Tools Required:
Parts Required:
Step-by-Step Instructions:
Step 1: Prepare your car and work area
- Ensure engine is cold, so you don’t burn yourself.
- Put on eye protection and gloves.
- Gather parts and tools.
Step 2: Put the convertible top in service mode
- As shown in the video from Road and Race, put the top in service mode.
- Start by releasing the convertible top via the latch.
- Open the roof and stop when the top is opened ~8 inches.
- Just under the compartment that covers the convertible top when it is down, disconnect the two cords located on each side of the top by simply pulling them out.
- Unclip the base of the top from the hooks on each side.
- Fold up the base of the top upward to reveal the horizontal carpet panel covering the engine.
- There should be a strap that you can use to keep the base on the top in place.
- If your car has a speaker panel or storage compartment, twist off the plastic clips that hold it in place and push it back.
Step 3: Gain access to the engine
- Slide and tilt both seats as far forward as possible to give yourself room to work.
- You will see a vertical carpeted panel with another horizontally oriented carpeted panel just above.
- As shown in the video, remove the compartment cover above the horizontal carpet panel; if you have the zipper style cover, unzip it, then undo the two plastic tabs by lifting them up and rotating them counter-clockwise. Pull out out the compartment cover.
- Lift up the edge of the horizontal carpet panel and remove the 4 plastic tabs by rotating them counter-clockwise.
- Now you can pry the vertical carpet panel out to reveal the metal engine lid.
- Use a ratchet and 10mm socket to remove the fasteners that hold the metal engine lid in place.
- Remove the engine lid from the car.
Step 4: Remove the old serpentine belt
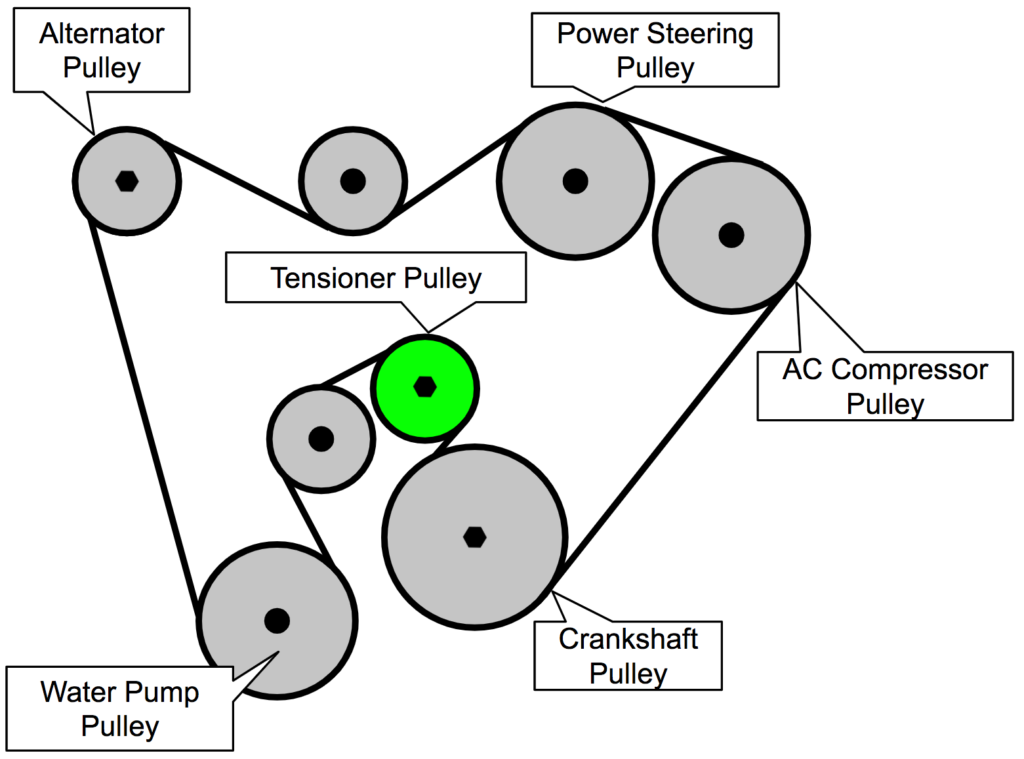
- Before you replace the serpentine belt, take a picture of the belt routing pattern.
- Locate the serpentine belt tensioner and use a shallow 24mm socket and ratchet to rotate it clockwise as far as it can go. This will remove tension from the belt.
- While holding the tensioner in this position, use your other hand to remove the belt off the alternator pulley.
- Slowly allow the tensioner to return to its original position, then guide the old belt off the remaining pulleys.
- Remove the belt, then inspect each of the pulleys for excess play, binding, etc. If you detect any issues, it is a good idea to replace the defect pulleys.
Step 5: Install the new serpentine belt
- Guide in the new belt and install it in reverse order, starting from the water pump pulley and routing it as shown in the diagram from the previous step.
- Put the belt over the tensioner pulley last.
- Use the 24mm socket and ratchet to rotate the tensioner pulley clockwise.
- Slide the belt over the tensioner pulley, then slowly allow the tensioner to return to its original position.
Step 6: Reinstall everything in reverse
- Reinstall the engine lid and just snuggly hand tighten the fasteners.
- Refit the vertical carpet panel and compartment cover.
- Clean up your work area and put away your tools.


