Your engine uses a serpentine belt to power the accessories like the power steering and water pumps. Over time, the belt gets worn out and can slip or even break. Visually inspect your serpentine belt for cracks, fraying, and other damage. In any case, it is a good idea to replace your serpentine belt according to the manufacturer’s recommended service interval.
The serpentine belt is relatively easy to change on the Porsche Panamera. To get an overview on how to replace the serpentine belt, check out this video from HumbleMechanic. While this video is not vehicle specific, it should give you a good idea on what is involved. Check out the rest of the article for detailed steps, tools, and parts required.
Screw-type clamps: 2.5 ft-lbs
Step 1: Remove Y-shaped air intake piping
- Ensure the engine is cold since you’ll be working in the engine bay.
- Open the hood and remove the y-shaped air intake pipe as shown in this video from Mechanics Life.
- Start by removing the plastic engine cover that sits above the throttle body; simply pull the cover upwards.
- Using a 7mm socket and a ratchet, loosen the three screw-type clamps on each end of the y-shaped pipe.
- Wiggle each end of the y-shaped pipe off until the entire pipe is free; move the y-shaped pipe out of the way.
- Finally, there is a coolant pipe that goes over the serpentine belt. Open the clips that hold it in place to give the pipe some flexibility and move it aside.
Step 2: Remove the old serpentine belt
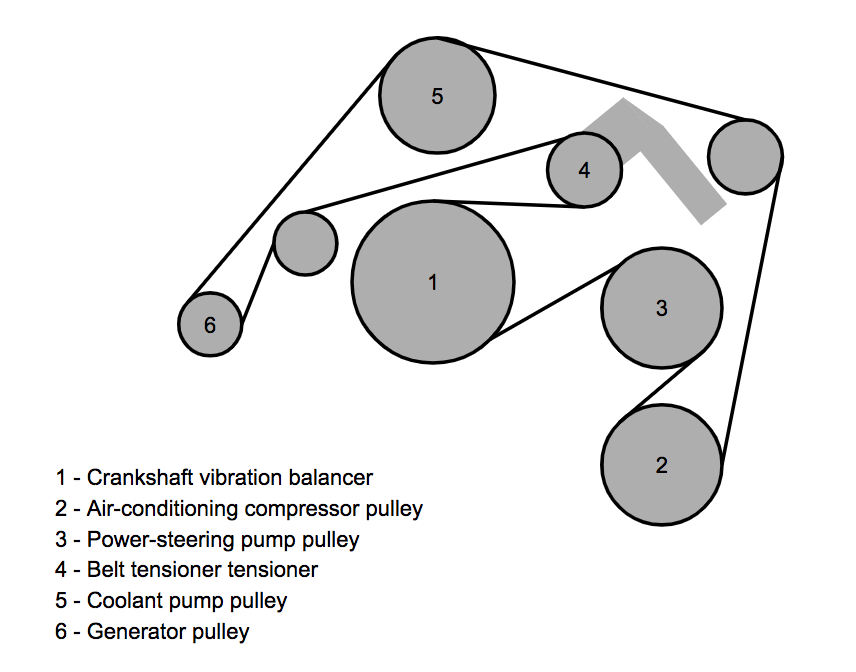
- Before replacing the serpentine belt, take a picture of the serpentine belt routing, so you can know how to reinstall the new belt.
- As shown in the video from Auto Repair Guys on the Porsche Cayenne, which the procedure is very to the Panamera’s, use a 30mm wrench or a ratchet with a thin 30mm socket to turn the tensioner hexagon clockwise (#4 in picture) as far as it will go. This will remove the tension from the serpentine belt, so you can remove it.
- While holding the tensioner in place, use your other hand to remove the serpentine belt completely; guide the the old belt around the coolant pump pulley and remove it from the engine bay
- Allow the tensioning pulley to slowly return to its original position.
- Inspect the various pulleys to ensure they roll smoothly and do not have excess play; replace any worn pulleys as needed.
Step 3: Install the new serpentine belt
- Starting with the coolant pump pulley, route the new serpentine belt; be sure to follow the same exact routing pattern and save the tensioner pulley for last.
- Using a 30mm wrench, turn the tensioner hexagon clockwise as far as it will go; this will allow you to slide the serpentine belt over the final tensioner pulley. You may need to use a good amount of force to get the new serpentine belt on.
- Refit all remaining parts in reverse; torque for screw-type clamps to 2.5 ft-lbs, or just hand-tighten them until snug.

