Changing your automatic transmission fluid (ATF) and transmission filter is important to keep your drivetrain smooth. While performing this service isn’t technically hard, filling the transmission fluid to the precise level is difficult without some experience. Therefore, we do not advise you attempt to do-it-yourself unless you are comfortable working on cars.
While Porsche recommends owners change the ATF and transmission filter every 16 years or 160,000 miles, we believe this is too long. For an overview of the procedure, check out the procedure from the YouTube channel, DIY Dan. Even if you don’t feel comfortable performing this service yourself, you can still save a bunch of money by purchasing the parts required online and paying an independent mechanic for just the labor.
- Mechanic’s Tool Set
- 17mm Hex Bit Socket, 1/2 Inch Drive (for fill plug)
- Torx Bit Socket Set, T10-T60 (T40 Torx bit for drain plug)
- K Tool International Low Profile Jack (3.33 Ton)
- ESCO 10498 Performance Jack Stands (Pair) (4 jack stands required)
- Wheel Chocks
- 1/2″ Drive Extension Breaker Bar
- 1/2 Inch Drive Click Torque Wrench (25-250 ft.-lb.)
- Socket Adapter & Reducer Set
- 1/4 Inch Drive Click Torque Wrench (20-200 in.-lb.)
- Fluid Transfer Pump Kit
- Foxwell NT510 Elite OBD2 Diagnostic Scanner (for Porsche) (for measuring correct ATF level)
- Etekcity Lasergrip 774 Digital Infrared Thermometer (less accurate alternative for measuring ATF level)
- Oil Drain Pan, 16 Quarts Capacity
- Safety Glasses
- Disposable Gloves
ATF Fluid Capacity: ~9 liters
17mm Hex Fill Plug: 52 ft-lbs
T40 Torx Drain Plug: 21 ft-lbs
Transmission Filt Bolts: 7.5 ft-lbs
ATF Pan Bolts: 4.5 ft-lbs
Step 1: Prepare your vehicle and work area.
- Start with a cold engine, so you can measure the ATF level correctly.
- Park your car on a flat surface.
- Gather required tools and parts.
- Put on gloves and eye protection.
Step 2: Raise your vehicle to give yourself extra clearance.
- If you have air suspension, simply raise your car to the highest ride height.
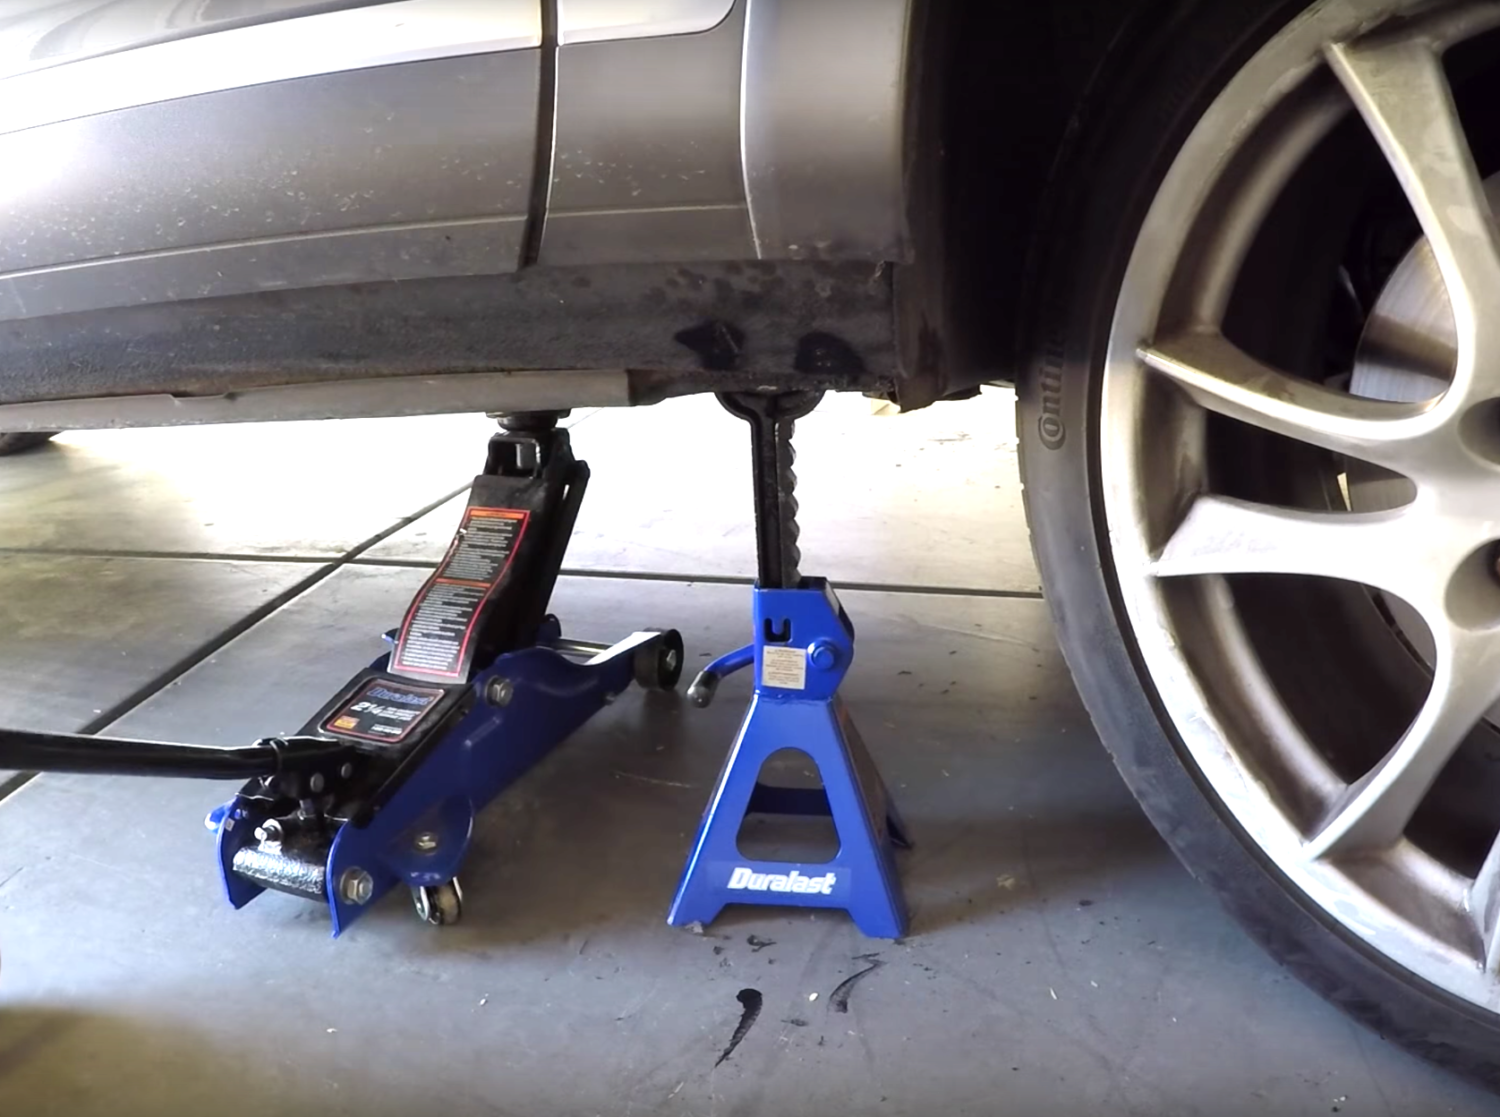
- If not, raise your vehicle with a lift or jack stands; it is very important your car is level during the procedure.
- If using a jack and jack stands, be sure to engage parking brake and use wheel chocks to prevent your car from rolling.
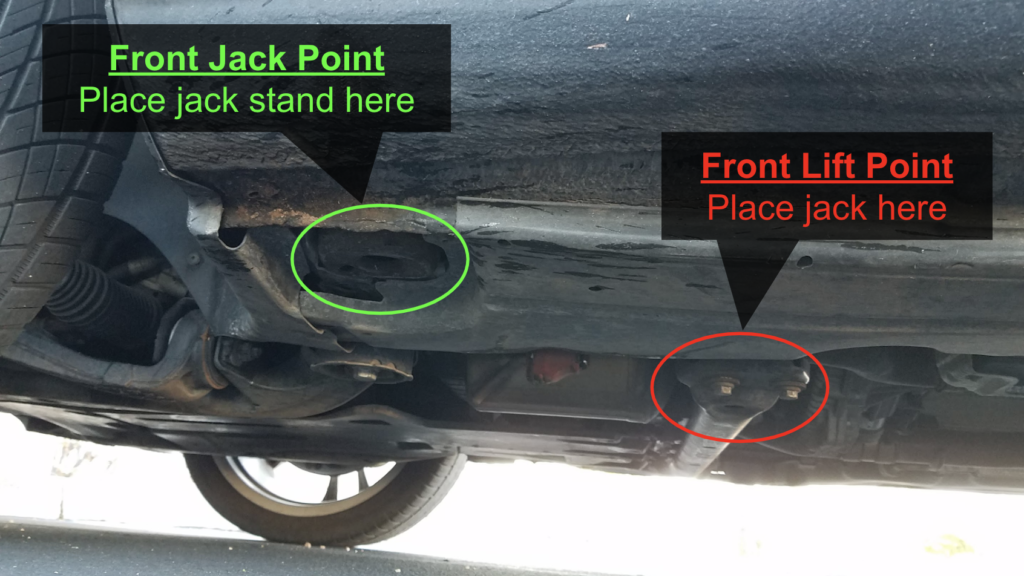
- To get jack stands on the front jack points, jack the vehicle by the center cross member as shown in the photos.
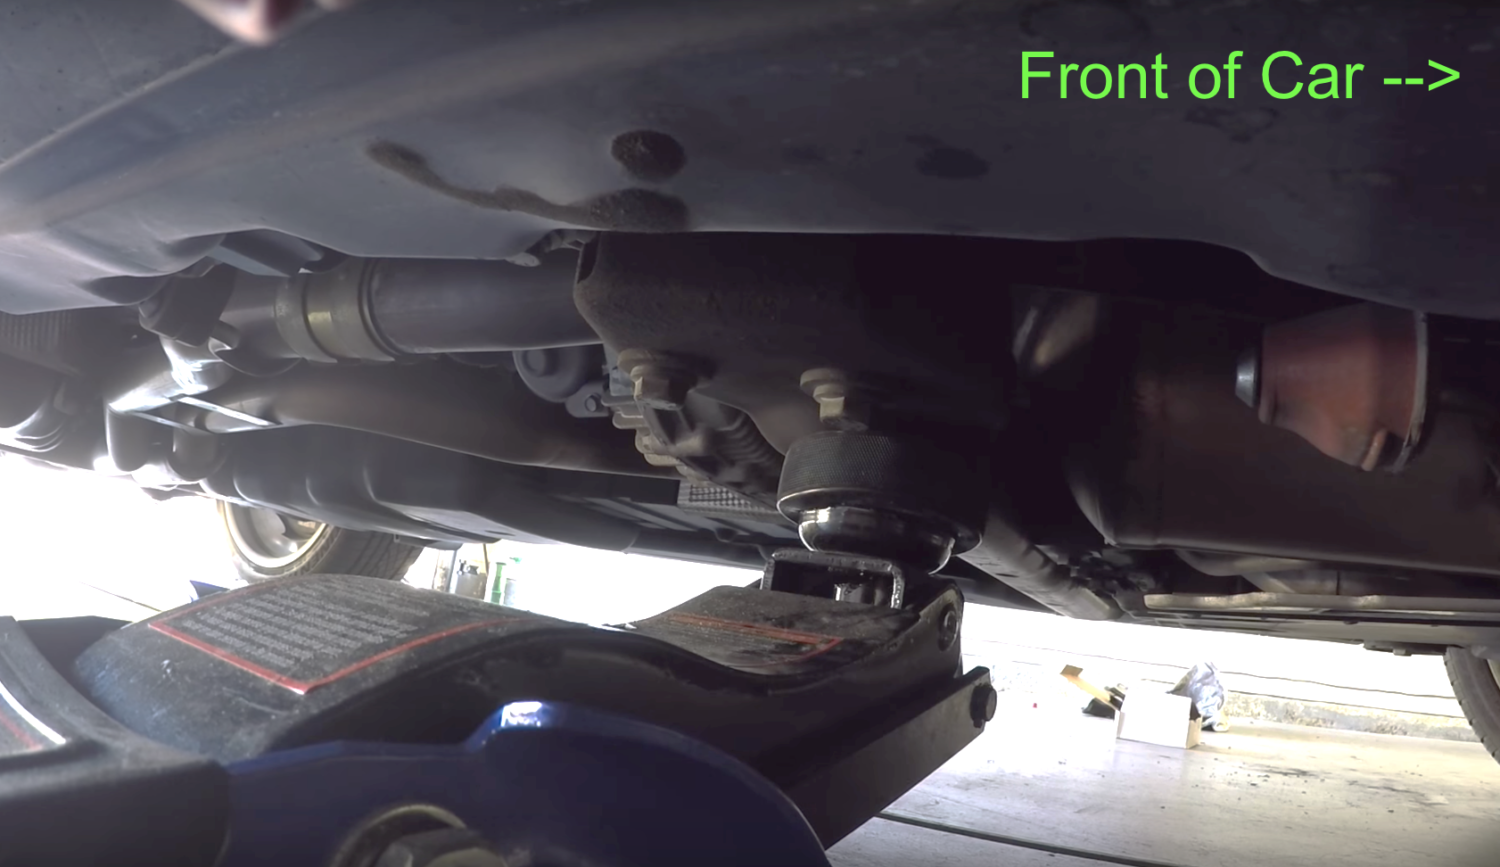
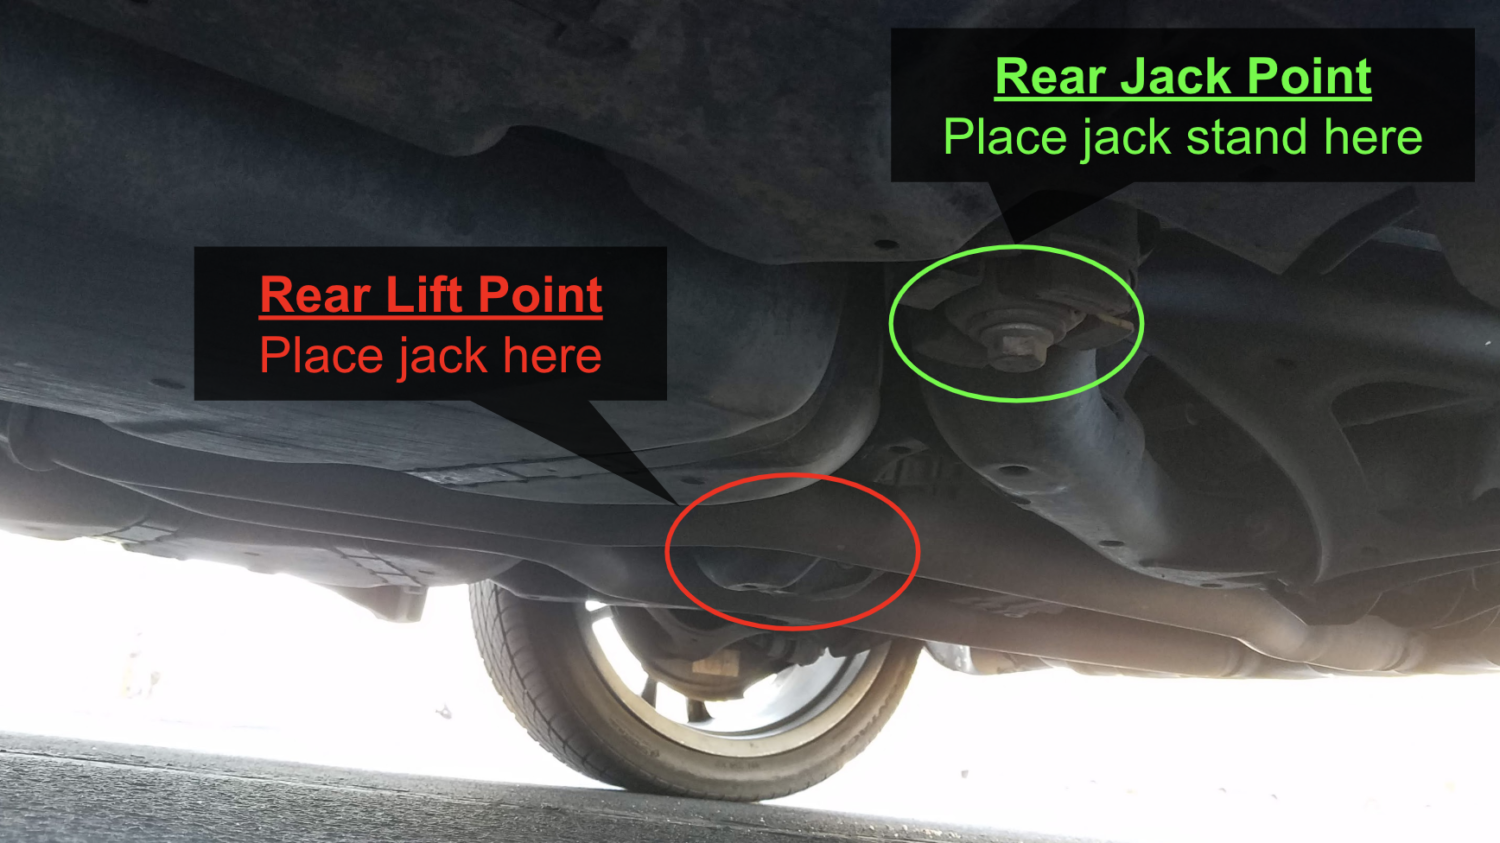
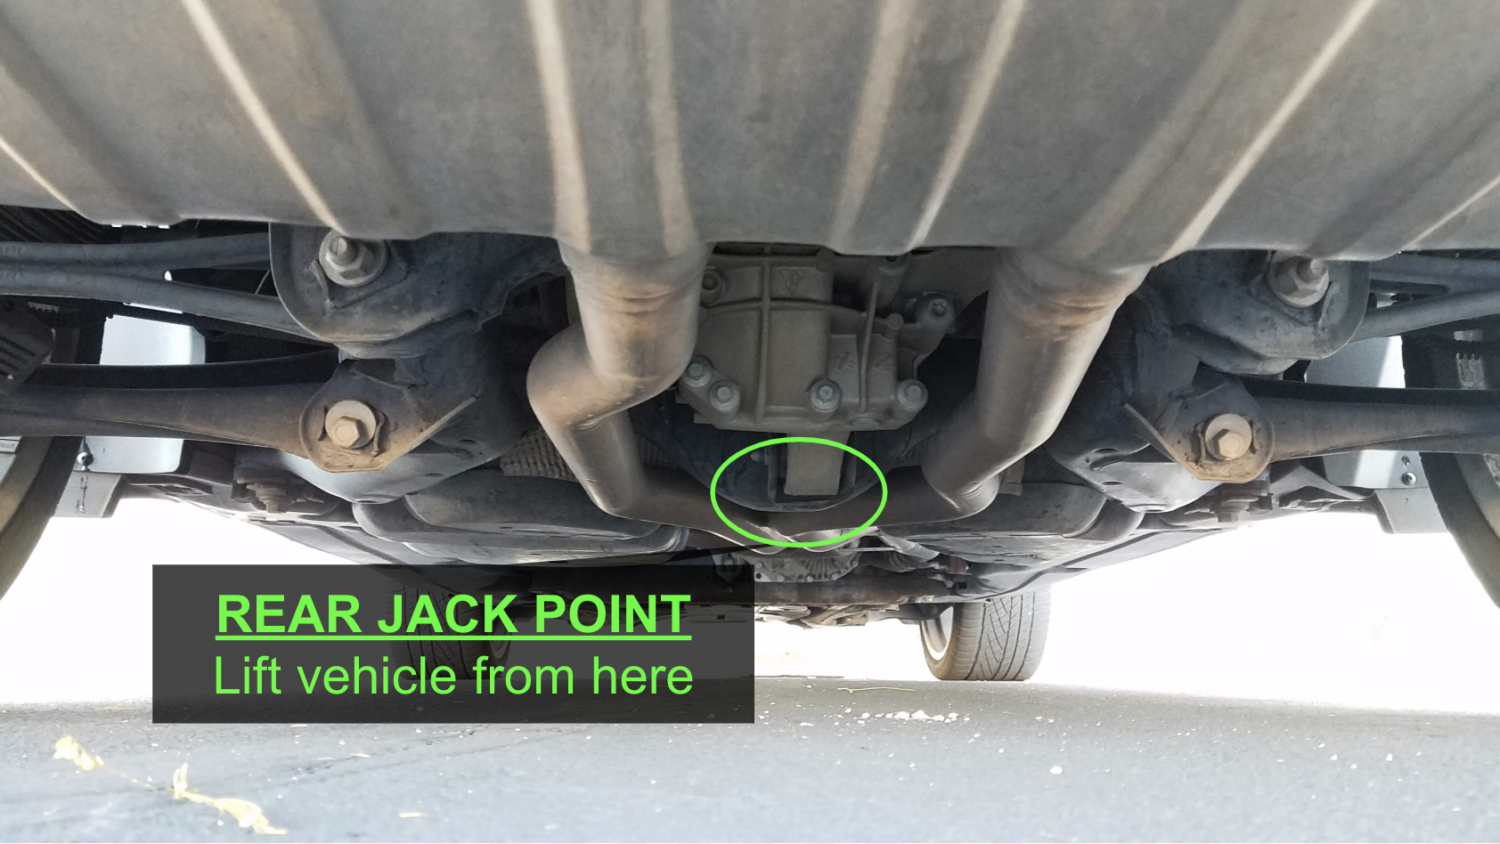
- To get jack stands on the rear jack points, jack the vehicle up be the rear cross member which is just ahead of the rear differential and in between the exhaust pipes.
- Once your vehicle is in the air, give it a hard shove to make sure it is securely supported.
- NEVER rely on a jack to support your vehicle.
- Note: If you have air suspension and decided to jack up the car, you will need to lock the air suspension by starting the car and holding the air suspension button up for 10 seconds. You will see an indicator pop up on your gauge cluster.
Step 3: Remove the underbody trays.
- Remove front underbody trays, which are held on by several T25 Torx screws and 10mm bolts.
- Also remove the panel covering the mid section of the vehicle, which is held on by 10mm bolts.
- Once you unclip the midsection underbody panel, use a 10mm socket to unbolt and remove the metal brackets at the end.
- Locate the transmission (towards middle of vehicle).
Step 4: Remove the transmission fluid fill plug.
- Remove the black ATF pan cover by unscrewing the 10mm bolts.
- You should now see two plugs on the bottom of the transmission pan.
- The larger plug is the fill plug; remove it using a 17mm hex bit socket and breaker bar.
- If you cannot get the fill bolt off, STOP and do not proceed with the procedure.
Step 5: Drain the automatic transmission fluid.
- Place a large drain pan that can hold at least 9 liters of fluid under the drain plug.
- Remove the drain plug using a T40 Torx bit and ratchet.
- Allow the ATF to drain for 15 minutes.
- Hand tighten the drain bolt back in, so no fluid drains out when you remove ATF pan.
Step 6: Remove the ATF pan.
- Place cardboard or something absorbent under the ATF pan to catch any fluid that may come out.
- The ATF pan is held on with numerous 10mm bolts. Loosen but do not fully remove these bolts.
- Because of the ATF pan seal, the ATF pan may remain stuck to the transmission.
- If necessary, use a flat head screwdriver to carefully pry the ATF pan loose.
- Then fully remove the bolts and drop the ATF pan.
- Pour any remaining ATF fluid in the pan into your drain pan.
Step 7: Remove the transmission filter.
- The transmission filter is held on by 3 10mm bolts.
- Remove these bolts, then pull the transmission filter out.
- Pour any fluid inside the transmission filter into your drain pan.
- If necessary, thoroughly clean your ATF pan with a degreaser such as dishwashing soap. Be sure to completely remove any residue and dry the ATF pan completely.
- Ensure the magnets on the ATF pan are in their proper positions.
Step 8: Reinstall the new transmission filter.
- Install the new o-ring gasket onto the transmission filter intake port.
- Place the transmission filter back in the transmission and ensure the o-ring gasket is seated properly.
- Screw the 10mm bolts back in by hand, then torque them to 7.5 ft-lbs in a criss-cross fashion to prevent pinching of the o-ring.
Step 9: Reinstall the ATF pan.
- Take your NEW gasket and insert the metal spacers.
- Place the new gasket over the ATF pan.
- Install the new gasket and ATF pan back onto the transmission.
- Screw in the 10mm bolts by hand, but don’t tighten them all the way just yet.
- Torque the 10mm bolts to 4.5 ft-lbs or just slightly by hand; be sure to use a criss-cross pattern to ensure the gasket is properly seated.
- DO NOT over torque the 10mm bolts or you can create a leak in the gasket.
- Finally torque the drain plug to 21 ft-lbs.
Step 10: Monitor the transmission fluid temperature.
- Next, you will need to begin monitoring the transmission oil temperature to fill the transmission to the correct level.
- Using a diagnostic tool such as Foxwell NT510 Elite, connect it to the OBDII port located in the driver-side footwell.
- Turn the ignition to the “ON” position.
- As shown in the video from Scan Tool Network, select your vehicle > select “manual” scan mode > select transmission module.
- Now select “Read data stream”, then explore the various options until you find the transmission oil temperature.
- Note: If you don’t have a suitable diagnostic tool, you can use a pyrometer to measure the temperature of the oil.
Step 11: Fill the transmission with an initial amount of fresh ATF.
- Place the drain pan back under the fill port.
- Attach the fluid pump to your container of ATF and pump fluid into the transmission fill port as shown in this video from BleeinJeep.
- While the ATF capacity is 9 liters, you will only be able to get 3-4 liters in initially.
- Once ATF begins to drip out of the fill port, have a friend start the vehicle while keeping it in Park.
Step 12: Add additional ATF and ensure you reach the correct level.
- Have a friend start the car and, with the brakes engaged, cycle the transmission from DRIVE and REVERSE while pausing at each gear for 5 seconds.
- This will cause the transmission to suck in ATF and allow you to pump in more ATF fluid.
- Pump in more fluid until you reach 9 liters or cannot add any more.
- Remove the fill adapter and allow the ATF to warm up, which will cause the ATF to expand and begin to overflow out of the drain port.
- Once the ATF temperature is between 95-104°F (35-40°C) and ATF is barely dribbling out, you’ve reached the correct level.
- Reinstall the drain plug along with a new seal and torque it to 15 ft-lbs.
- Note: If at the target temperature range ATF does not drip out, you need to add more fluid. If the ATF fluid exceeds the target temperature, turn off the engine and allow the transmission oil to cool down before repeating this procedure.
Step 13: Reinstall everything and lower your vehicle.
- Reinstall everything in reverse.
- Just hand tighten the black ATF pan cover and underbody panel fasteners.
- Lower your vehicle.
- Save your old ATF in a contain, so you can drop it at your local auto parts store to recycle.
- Clean up your work area and put away your tools.


