Most vehicles utilize numerous drain ports to prevent water from collecting in exposed areas of the vehicle such as the windshield cowl, fenders, and rocker panels. Over time, debris such as dirt and leaves will clog these drain ports. This can cause water to back up and possibly get inside your vehicle and other sensitive areas. It is important to routine inspect and clear your vehicle’s drain ports to prevent costly issues.
For an overview of the procedure, check out the video above from YouTube channel, CarFanatic. While the video covers the process on a 955/957 Cayenne, it also applies to the 958 Cayenne and Volkswagen Touareg. You can find detailed instructions below.
Tools Required:
Step-by-Step Instructions:
Step 1: Prepare your vehicle and work area.
- Ensure your engine isn’t hot, so you don’t burn yourself.
- Park your car on a flat surface.
- Ensure you have a water hose handy.
- Apply the parking brake.
- Put on eye protection and gloves.
Step 2: Inspect the firewall body drains.
- Take a water hose or bucket of water and pour water over the windshield wiper area.
- Look at the bottom of your car behind the front wheels to see if water drips out.
- If water drips out quickly, then your drains are okay.
- If water drips out very slowly or not at all, proceed to the next steps.
Step 3: Raise your vehicle.
- If your car has air suspension, simply raise it to the highest ride.
- To raise your car using a jack and jack stands, start by chocking off the rear wheels so your car can’t roll back.
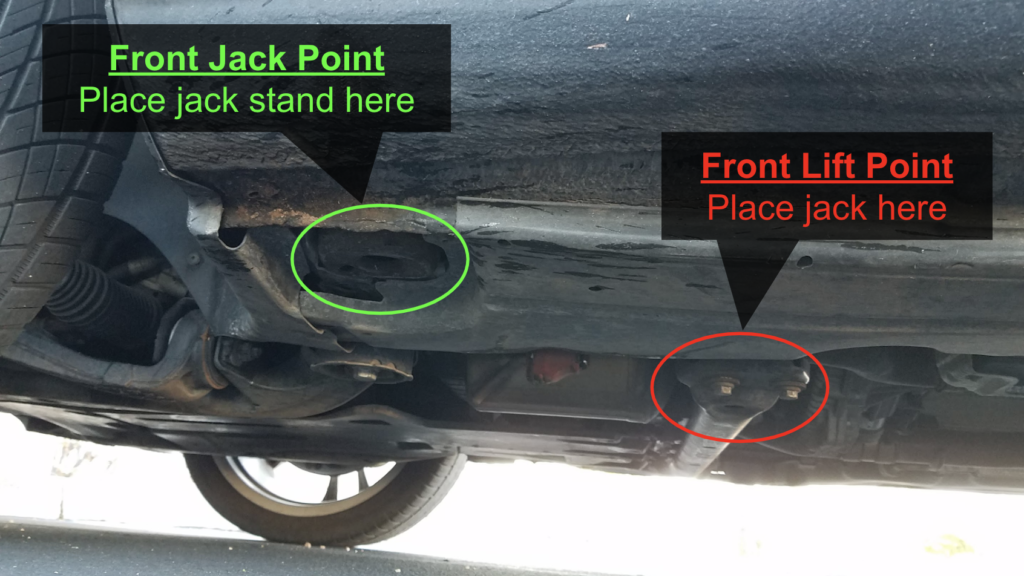
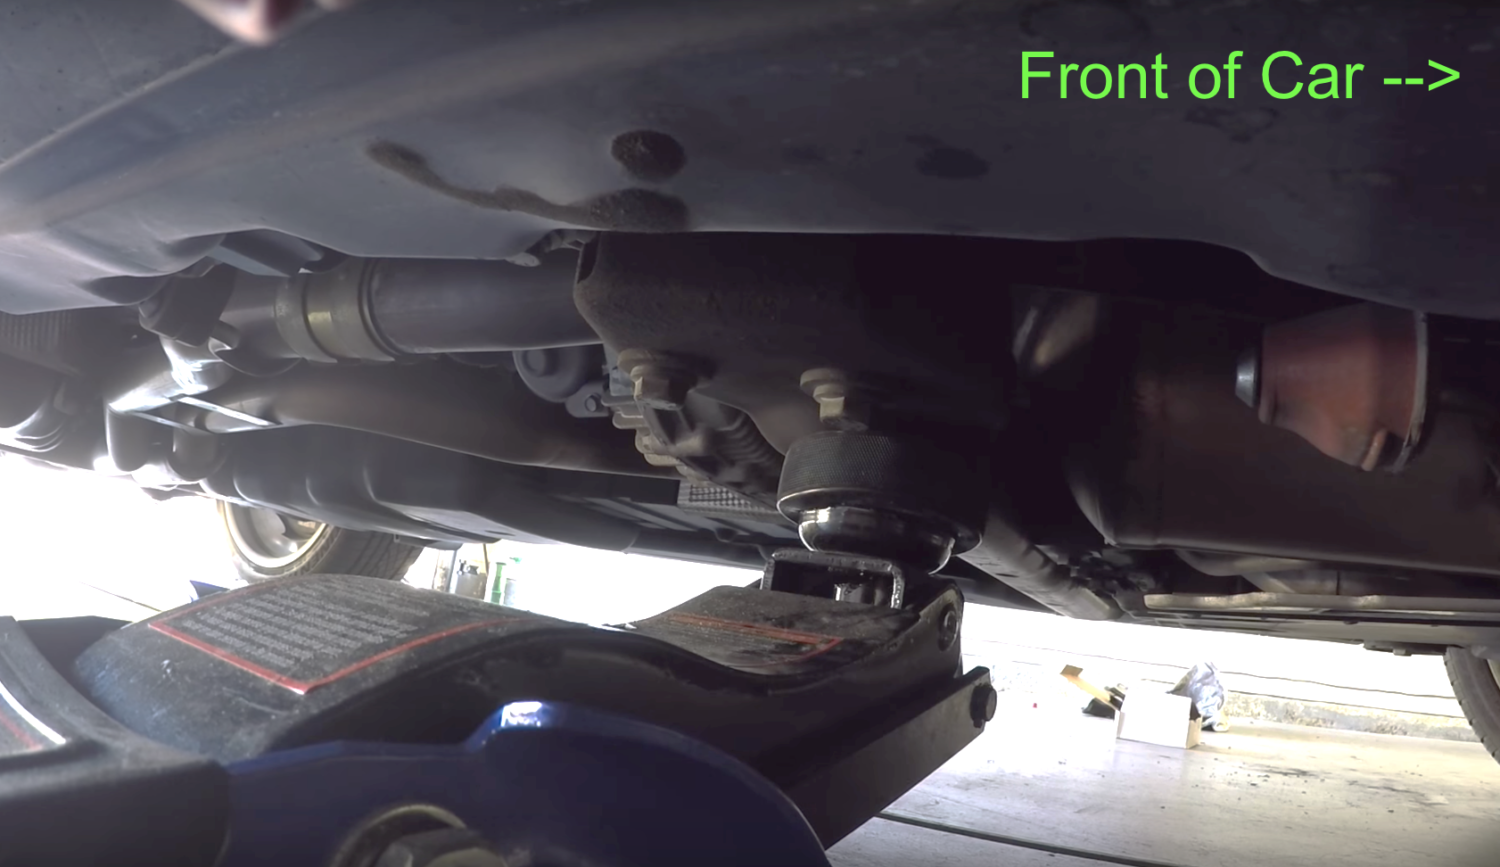
- Place your jack along with a hockey puck (to prevent damage) on the center cross member as shown in the video.
- Lift up the front corner until the wheel is off the ground.
- Place the jack stand under the front jack point and lower the car until it rests on the jack stand; NEVER RELY ON A JACK TO SUPPORT YOUR VEHICLE.
- Give your car a hard shove to make sure it’s stable.
- Note: If you have air suspension and decided to jack up the car, you will need to lock the air suspension by starting the car and holding the air suspension button up for 10 seconds. You will see an indicator pop up on your gauge cluster.
Step 4: Starting with one corner, gain access to the firewall body drain.
- Start by turning the steering wheel all the way in the opposite direction of the corner you will be working on first.
- Remove the T25 torx screws that secure the front wheel liner; you only need to remove the screws that hold on the rear portion (side of wheel liner facing towards the middle of the car).
- Peel open the wheel liner to gain access to the front water drain port.
Step 5: Clean out the firewall body drain.
- As shown in the video, use a flashlight to locate the water drain port plug which is located pretty high up in the fender.
- The drain port plug is rubber and are shaped like a + sign.
- Pull the water drain port plug out and use your finger to see if there is debris blocking the hole. If there is, use your finger or a small screwdriver to break up the debris.
- Take a water hose or bucket of water and run water down the windshield cowl area to help flush the dirt and debris out.
- When you’re done cleaning the drain area, cut 1/2 inch of the tip of the drain port, then reinstall it; this will make the opening bigger and prevent it from getting clogged in the future.
- Reinstall the wheel liner and hand tighten the screw.
- Repeat these steps on the other side of the vehicle.
Step 6: Clear the rocker panel drains
- Each rocker panel has a small drain port on the bottom and just behind the front wheels.
- Once you locate them, take a small screwdriver and carefully poke through the drain port to help clear it of any debris.
- If the drain port is still clogged, pry out the drain port and use a water hose to carefully shoot water into the hole to help clean out the debris.
Step 7: Clear the rear body drains
- At the rear of the car, there is a drain port on each side of the vehicle just behind each rear wheel.
- Raise the rear of the vehicle either using a jack and jack stand; alternatively, if you have air suspension, just put your vehicle into the highest setting.
- Remove just the rearward part of the fender liners which are held by five T25 Torx screws (3 inside the wheel well and two underneath the bumper).
- Peel back the rearward part of the fender liners and locate the drain ports.
- Use a pair of scissors to snip the tip of the drain ports off, so they aren’t as restrictive and less likely to get clogged.
- Reinstall the fender liners.
Step 8: Inspect the trunk hatch drain ports
- Go to the trunk hatch and open it.
- On the base of the hatch, you should see two plastic drain ports on each side.
- Take a small screwdriver and poke it through each drain port to see if the valve inside is able to move freely.
- If the valve can move freely, the drain port is okay.
- If the valve cannot move freely, pry out the drain port and clean it as necessary before reinstalling it.
Step 9: Modify the front sunroof drain ports
- The front sunroof drain ports are located in the front driver and passenger footwells.
- Start with the passenger footwell and remove the plastic panel under the glove compartment. On the 955/957 Cayenne, remove the sole T20 Torx screw, then pull down on the panel to release the clips. On the 958 Cayenne, just pull down on the panel to remove it.
- Disconnect the power outlet and footwell light connectors and remove the plastic panel.
- As shown in the video, the front passenger drain port is located in the upper passenger side corner underneath the insulation material.
- Grab a small cup, then pull the drain port from the firewall and place the cup underneath just in case water comes out.
- Cut the tip of the drain port, so it is no longer pinched off.
- Reinstall the drain port and BE SURE to properly seat the drain port into the firewall. If you don’t, water will likely enter the footwell. To double check, gently pull on the drain port; it should not come out not come out.
- Reinstall everything and repeat on the other side; for the driver’s side, you do not need to remove anything. It is located in the top corner on the driver’s side and can be found under the insulation material.
Step 10: Clean out the front sunroof drains
- As shown in the video, use hot soapy water to clean out the front sunroof drains.
- Put the hot soapy water in a measuring cup or something easy to pour.
- The front sunroof drain holes are located in each of the front corners of the sunroof.
- Starting with one corner, hold the sunroof wind deflector down and locate the drain hole.
- Pour a little bit of hot soapy water into the hole; water should begin to drip down the bottom of the vehicle just behind the front wheel.
- Repeat these steps on the other front sunroof drain.
- Note: If water doesn’t drain out of the bottom of the vehicle, run weedwacker string through the each of the drain holes to help unclog them.
Step 11: Modify the AC evaporator drain port
- Before putting the passenger side footwell back together, modify the AC evaporator drain port.
- As shown in the video, pull the AC evaporator drain port out.
- On the end that attaches to the firewall, you should see a flap that restricts the tube’s opening.
- Rip the flap off, which will prevent the AC evaporator drain port from getting clogged in the future.
- Carefully reinstall the AC evaporator drain port and ensure it is seated properly against the firewall.
- Reinstall the plastic panel.


Bert says:
How do you get the sills out if water flooded the carpet on the passenger side please.
Thanks in advance bertsboat@mindspring.com
ecarguidesllc says:
You will have to dry out the carpet and insulation and then follow the procedures here to clear the various drain ports.
Kjetil Ove Grimstad says:
Hi I have a Cayenne 2014 and I have a lot of water inside the channels.
Its sounds like Im driving a bathtub 😉
How do I get the water out?
ecarguidesllc says:
Hi Kjetil. Great question. Follow the steps in this DIY to clear the drains. Also, if you’re hearing sloshing, you may have water in your spare tire compartment. It is common for the rear sunroof drains to clog up and send water back there. Hope this helps and please report back!
Jeanne says:
I have a 2017 Cayenne and the tech at the dealer cleared the drain under the hood but I still have water sloshing. There is a drip coming from a small cover under my car located in the place where you demonstrated the rocker panel drain. On the 2017 model, is this a cover for the drain?
Scott G says:
I can’t find anything online referring to the charging port tray and/or fuel tray water drains. I see a lot of water there after a car wash and need guidance on how to best clear those drains.
– 2016 Cayenne S E-Hybrid
Billy Smith says:
I am getting the occasional water drip on the driver side next to the console towards the firewall when running the A/C. Do you have any idea on my issue? 2010 Porsche Cayenne Base model.